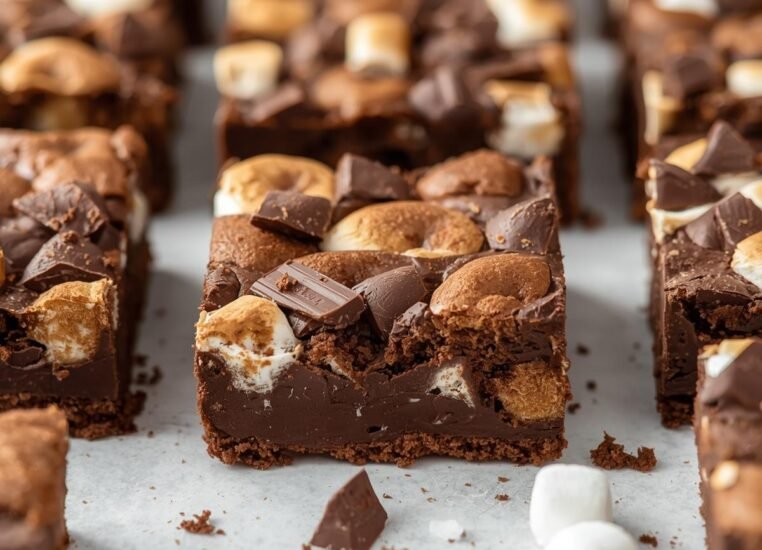
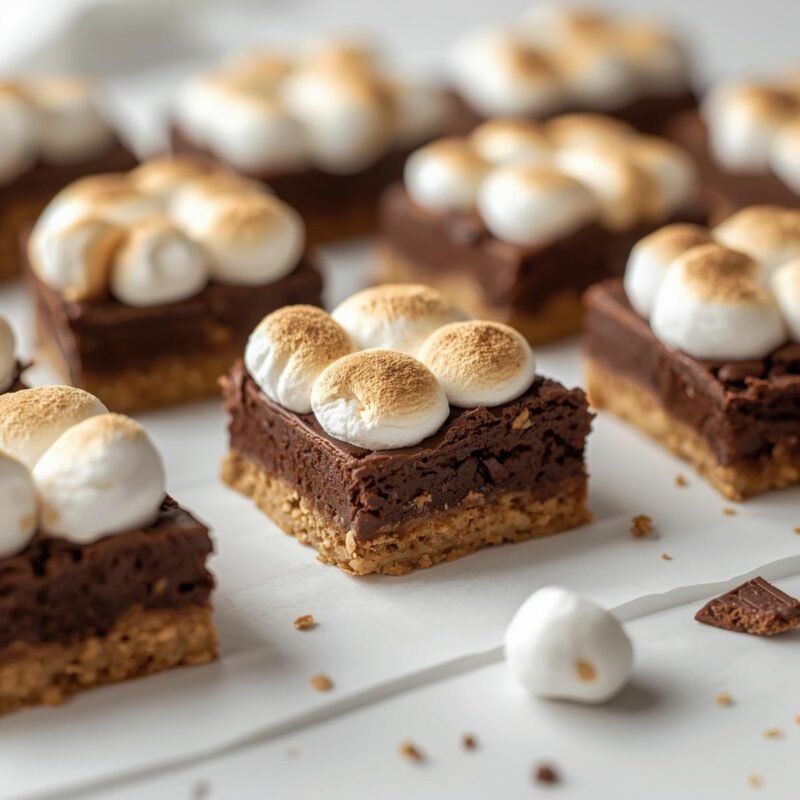
You want a dessert that tastes like a campfire treat but bakes neatly in one pan. This recipe does that. You get a crisp graham cracker layer, dense chocolate brownies, melted chocolate pockets, and toasted marshmallows on top.
This guide gives you the full recipe, exact measurements, baking times, and the small choices that make a big difference, such as when to add marshmallows and how to cut clean squares.
If your last batch turned dry, gooey in the middle, or stuck to the pan, you will know how to fix it here.
Why S’mores Brownies Work
The appeal comes from contrast. A good s’mores brownie has more than sweetness. It combines a buttery graham base, a chewy brownie center, and a soft marshmallow top that browns just enough to add flavor.
The layers also solve a common baking problem. Plain brownies can feel one-note, and classic s’mores can turn messy fast. In a baking pan, the graham crackers stay in place, the brownie batter bakes around them, and the marshmallows become part of the topping instead of sliding off.
That balance matters. Too many marshmallows can melt into a sticky sheet. Too little chocolate can make the bars taste flat. If you keep each layer moderate, every bite tastes like all four parts at once.
Weak image match · 5/10 Shows toasted marshmallows with fire, but not the actual s’mores brownies.
Ingredients for the Recipe
Before you start, gather everything and measure it out. Mise en place matters with brownies because once the batter is mixed, you want it in the oven quickly.
- For the graham base: 9 full graham cracker sheets, 5 tablespoons melted unsalted butter, 1 tablespoon sugar.
- For the brownie batter: 10 tablespoons unsalted butter, 1 cup granulated sugar, 1/2 cup light brown sugar, 2 large eggs, 1 egg yolk, 2 teaspoons vanilla extract, 3/4 cup all-purpose flour, 1/2 cup unsweetened cocoa powder, 1/2 teaspoon fine salt.
- For the mix-ins and topping: 1 cup chopped milk chocolate or semisweet chocolate, 2 cups mini marshmallows.
Use bar chocolate if you can. It melts into better pockets than many chocolate chips, which are made to hold their shape.
Helpful Tools and Equipment
A few basic tools make this recipe easier and more consistent. The most useful item is the 8-inch square pan. It gives you thick brownies without forcing you to overbake the edges.
Mixing tools
Use one medium bowl for dry ingredients and one larger bowl for the butter, sugar, and eggs. A whisk works well for the wet mixture, and a silicone spatula helps fold in flour without overmixing.
Baking setup
You also need parchment paper, measuring cups and spoons, and a small saucepan or microwave-safe bowl for melting butter. A light-colored metal pan bakes more evenly than glass, which often makes the edges firmer before the center is ready.
If you own an instant-read thermometer, use it. Brownies usually finish around 190 to 205°F in the center, depending on how fudgy you like them.
Recipe Ingredients Table
Use this table as your quick reference before baking. Measurements are listed for one 8-inch pan.
| Ingredient | Amount | Notes |
|---|---|---|
| Graham cracker sheets | 9 full sheets | Enough to cover the bottom in a single layer |
| Melted unsalted butter | 15 tbsp total | 5 tbsp for crust, 10 tbsp for batter |
| Granulated sugar | 1 cup | Helps create a shiny top |
| Light brown sugar | 1/2 cup | Adds moisture and chew |
| Eggs | 2 large + 1 yolk | Extra yolk makes the texture richer |
| Vanilla extract | 2 tsp | Rounds out the chocolate flavor |
| All-purpose flour | 3/4 cup | Spoon and level for accuracy |
| Unsweetened cocoa powder | 1/2 cup | Natural cocoa works well here |
| Fine salt | 1/2 tsp | Balances the sweetness |
| Chopped chocolate | 1 cup | Milk, semisweet, or a mix |
| Mini marshmallows | 2 cups | Add near the end for best texture |
If you like darker brownies, swap half the milk chocolate for bittersweet chocolate. The rest of the formula can stay the same.
Preparing the Baking Pan
Pan prep affects texture more than most people expect. The goal is an even bake and easy removal, so focus on parchment.
Cut one strip of parchment wide enough to cover the bottom and run up two opposite sides with some overhang. Grease the pan lightly first so the paper sticks, then grease the parchment too. This second coat helps the brownie edges release cleanly.
For the graham layer, crush the sheets into rough crumbs or press whole sections into the bottom. Mix the crumbs with 5 tablespoons melted butter and 1 tablespoon sugar, then press firmly into the pan. Use the bottom of a measuring cup to compact it. A loose crust breaks apart once sliced.
Making the Brownie Batter
Dense brownies come from careful mixing, not complicated steps. Your batter should look glossy and thick before it goes into the pan.
Melt and combine the wet ingredients
Melt 10 tablespoons butter. Whisk it with the granulated sugar and brown sugar for about 1 minute. Add the eggs, extra yolk, and vanilla, then whisk until the mixture looks smoother and slightly lighter, about another 45 seconds.
Add the dry ingredients without overworking
In a separate bowl, stir together the flour, cocoa powder, and salt. Fold the dry mix into the wet ingredients with a spatula just until you no longer see dry streaks. Stir in about 3/4 cup of the chopped chocolate.
Stop there. If you keep mixing for several minutes, the brownies can turn cakey and lose that chewy center people want.
Layering the S’mores Elements
Order matters here. If you pile everything on top too early, the marshmallows can burn before the brownies set. The best layering method keeps each element clear.
Spread the batter over the prepared graham crust in an even layer. An offset spatula helps, but the back of a spoon works too if you dip it in warm water. Scatter the remaining chopped chocolate over the batter and press the pieces in lightly so they do not sit fully exposed.
Hold the marshmallows back for now. You will add them near the end of baking. That one timing change gives you toasted tops instead of blackened sugar.
Baking and Broiling Tips
Start the pan in a 350°F oven on the center rack. Bake for 24 to 28 minutes before checking. The brownies are ready for the topping when the edges look set and the middle still has a slight wobble. That is your timing cue.
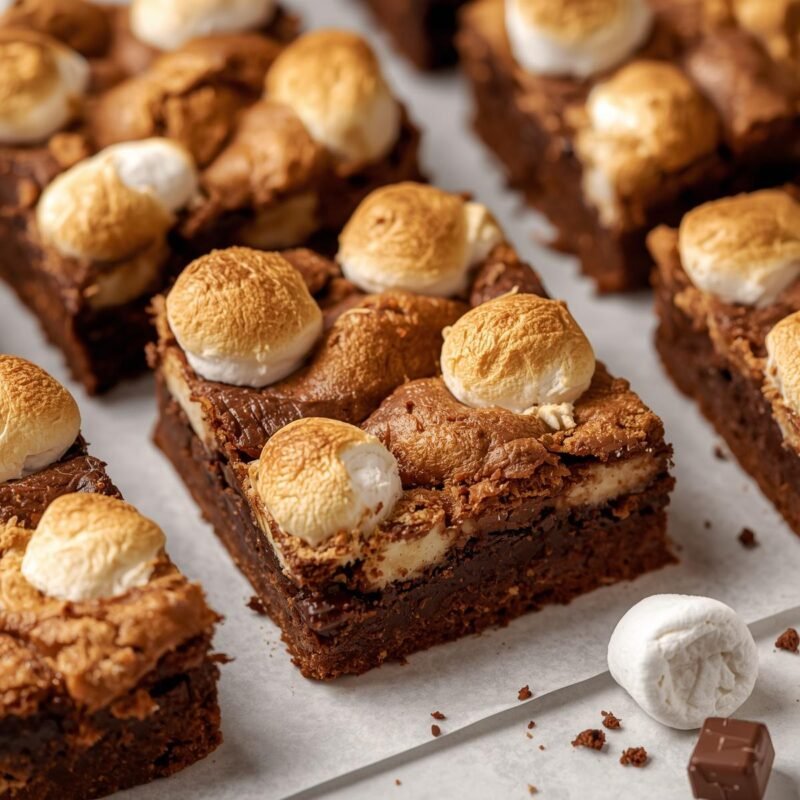
Adding marshmallows
- At 24 to 28 minutes: Pull the pan out and scatter 2 cups mini marshmallows across the top.
- Return to oven: Bake 3 to 5 minutes more, just until the marshmallows soften and puff.
- Optional broil: Broil 30 to 60 seconds for color, watching the whole time. Marshmallows can go from golden to burned fast.
Use a toothpick near the center, but do not expect it to come out clean. A few moist crumbs are perfect. Raw batter means it needs a bit longer.
Cooling and Serving Ideas
Cutting too early ruins the structure. Give the pan at least cooling time of 1 hour at room temperature. For cleaner slices, chill the pan for 20 more minutes after that.
Lift the slab out with the parchment overhang and use a sharp knife greased lightly with neutral oil. Wipe the blade between cuts if the marshmallow sticks. This small step makes the squares look far better.
Serve as is, or warm a piece for 10 seconds in the microwave and add vanilla ice cream. A spoonful of chocolate sauce and a dusting of crushed graham crackers make the bars feel finished without much work.
Storage and Make-Ahead Notes
These brownies keep well, but marshmallows change after a day or two. For the best storage result, place cooled squares in an airtight container with parchment between layers.
At room temperature, they stay good for 2 days. In the fridge, they last about 5 days, though the marshmallows become chewier. Warm chilled brownies for 8 to 10 seconds before serving to soften the top again.
You can also prep ahead. Make the graham crust and brownie batter separately, refrigerate the batter for up to 24 hours, then assemble and bake. Freeze baked squares, wrapped tightly, for up to 2 months. Thaw at room temperature before reheating.
Common Questions Answered
Small changes can affect the final pan, so a few FAQs help.
Can I use boxed brownie mix?
Yes. Use an 8-inch pan if the mix is for an 8×8 batch, or only part of a larger mix. Keep the graham crust and marshmallow timing the same.
Why did my marshmallows disappear?
They likely baked too long. Add them only in the last few minutes. Large marshmallows can also melt unevenly, so mini marshmallows work better.
Can I use a 9-inch pan?
Yes, but the brownies will be thinner and bake faster. Start checking around 20 to 22 minutes before adding the marshmallows.
Why were my brownies dry?
Most often, the pan stayed in the oven too long or too much flour went in. Spoon flour into the measuring cup instead of scooping straight from the bag.
If you want the best batch on your first try, focus on three things: measure carefully, add the marshmallows near the end, and cool the brownies before slicing. Those steps shape the texture more than fancy ingredients do. A simple pan, parchment paper, and steady timing are enough.
Once you know the base method, you can adjust the chocolate, use dark cocoa, or add a pinch of flaky salt on top. Keep notes on bake time in your own oven. A difference of two minutes can change fudgy brownies into firm ones, and that is useful information for the next pan.