The sun is shining, the birds are chirping, and you’ve got the gardening itch.
You wander over to the shed and grab your seed packets, dreaming of the colorful blossoms soon to come.
But wait – do you know the best time to get those zinnia seedlings in the ground?
Plant them too early and they’ll get stunted by chilly weather. Plant them too late and the summer sun will scorch them before they have a chance to thrive.
Zinnia Growing Seasons
Planting Zinnia Seedlings
If you want your zinnias to thrive, it’s important to understand their growing seasons. Zinnias are warm-weather flowers, so the perfect time to plant the seedlings depends on your location and climate.
In areas with short summers, plant seedlings after the last spring frost when overnight lows stay above 40 F. For most of the U.S., late May or June is ideal. Southern gardeners can plant even earlier, in late March or April.
- Start seedlings indoors 4 to 6 weeks before the last frost to get a head start on the growing season. Once seedlings are 3 to 4 inches tall with several sets of true leaves, it’s time to harden them off.
- To harden off seedlings, place them in a sheltered area outside for a few hours a day, gradually increasing time over a week. This helps them adapt to outdoor conditions before transplanting.
- Space seedlings 12 to 18 inches apart in a spot with fertile, well-drained soil and full sun – at least 6 to 8 hours of direct light per day.
- Water the seedlings regularly, especially for the first few weeks after transplanting while they establish themselves. An inch of rain or watering per week is typically enough.
- Once flowers start blooming, fertilize the plants every few weeks. Look for a balanced, all-purpose fertilizer with equal parts nitrogen, phosphorus, and potassium.
Follow these tips and your zinnias will thrive all season long, giving you months of bright blooms to enjoy! With the right planting time and care, you’ll have a colorful zinnia garden in no time.
Preparing Your Garden Bed for Zinnia Seedlings

To give your zinnia seedlings the best start, you’ll want to prepare a garden bed that will keep them happy and healthy.
First, choose a spot in your garden that gets plenty of sunlight throughout the day, at least 6 to 8 hours. Zinnias love the sun, so a shady area just won’t do.
Next, turn over the top 6 to 8 inches of soil so it’s loose and airy.
Zinnias have big root systems, so they’ll appreciate soil they can spread out in. At the same time, mix in some compost or other organic matter to provide nutrients. Your seedlings will thank you for the boost.
Spacing and Support
Give each seedling 12 to 18 inches of space to grow into.
And once they start blooming, those flower heads will get heavy. Place a stake next to each seedling so you can tie up stems and provide support as the plant matures.
Finally, check that the pH of your soil is between 6 and 7.
If it’s too acidic or alkaline, your zinnias won’t be able to properly absorb nutrients. Add lime to raise the pH or sulfur to lower it.
With the proper site selection, soil preparation, spacing, and support, your zinnia seedlings will thrive and provide you with a summer full of bright blooms.
Before you know it, you’ll have a rainbow of zinnias lighting up your garden beds!
Sowing Zinnia Seeds Indoors vs. Directly Outdoors
When it comes to sowing zinnia seeds, you have two options: starting them indoors or direct sowing them in your garden. Each approach has its pros and cons, so consider your climate, gardening skills, and patience level before deciding.
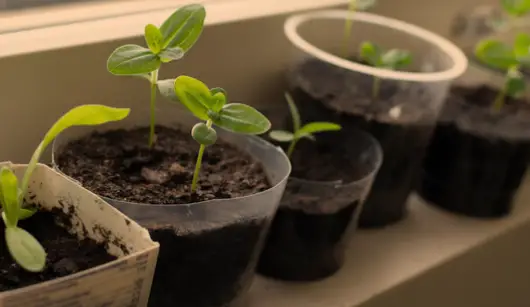
Starting Seeds Indoors
If you have a short growing season or just can’t wait to get started, sow zinnia seeds indoors 6 to 8 weeks before the last spring frost. This gives the seedlings a head start so they’ll be ready to transplant once the weather warms up. You’ll need seed trays, potting mix, and a sunny spot in your home.
- Sow 2-3 seeds per cell, about 1/4 inch deep. Keep the soil moderately moist while seeds germinate.
- Thin seedlings so only the strongest one remains in each cell. This prevents overcrowding as the seedlings grow.
- Fertilize seedlings weekly with a balanced, all-purpose fertilizer at 1/2 the recommended strength.
- Hardening off seedlings by exposing them to longer periods of outdoor conditions over a week or two helps them transition to your garden.
While starting seeds indoors requires more work, it allows you to grow more varieties and have zinnias blooming sooner.
However, leggy or root bound seedlings may struggle after being transplanted.
Direct Sowing Outdoors
Once the chance of frost has passed and soil has warmed to 65-70 F, you can sow zinnia seeds directly in your garden.
This low-fuss approach avoids the hassle of starting seeds indoors and transplanting. However, it can delay blooming and limit the varieties you can grow.
- Sow seeds 1/4 inch deep and 2-3 inches apart. Keep soil consistently moist while seeds germinate, which typically takes 7 to 14 days.
- Thin seedlings so they are at least 6 to 18 inches apart, depending on the variety. This prevents overcrowding and competition for light and nutrients.
- Start fertilizing seedlings once they are a few inches tall. Use a balanced, all-purpose fertilizer at 1/2 the recommended strength.
While direct sowing is simpler, there is more uncertainty and you rely on the weather to cooperate during the short window for sowing. However, the seedlings tend to experience less stress since they are not transplanted. With the right conditions, your zinnias will bloom just fine using this straightforward approach.
Transplanting Young Zinnia Seedlings
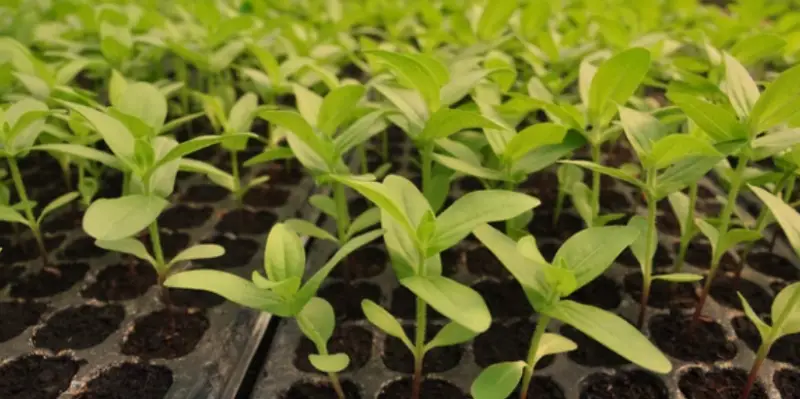
Planting Zinnia Seedlings
Once your zinnia seedlings have two sets of true leaves, they’re ready to transplant into the garden.
This usually takes 3 to 4 weeks after sowing the seeds. Transplanting at the right time is key to the seedlings’ success.
Transplanting Young Zinnia Seedlings
Carefully dig holes for your seedlings that are slightly larger than the size of their containers. Gently remove the seedlings from their containers, handling only the leaves.
Never grab the delicate stem! Place one seedling in each hole, backfilling the soil around it and patting down firmly.
Water the seedlings thoroughly after transplanting.
Their roots have just been disturbed, so keeping the soil moderately moist is important while they establish themselves.
Water when the top inch or so of soil is dry for the first week or two. After that, you can reduce watering to about an inch per week.
Fertilize the seedlings 3 to 4 weeks after transplanting.
Use a balanced fertilizer with equal parts nitrogen, phosphorus, and potassium, such as 10-10-10. Follow the directions on the product packaging and dilute to 1/2 the recommended strength. Fertilizer will provide nutrients for your zinnias to produce healthy foliage and flowers.
Once seedlings are transplanted, there are a few other things to keep in mind:
• Plant spacing – Space seedlings 6 to 18 inches apart depending on the variety. This gives them enough room to grow into sturdy plants.
• Hardening off – If seedlings were started indoors, be sure to harden them off before transplanting. This means gradually exposing them to outdoor conditions over 7 to 10 days.
• Pests and disease – Inspect seedlings regularly for signs of aphids, spider mites, powdery mildew, and other potential problems. Treat them immediately to avoid damage.
• Pruning – Pinch off side shoots for bushier growth and stronger stems. Remove dead or dying leaves and flowers to improve the plant’s appearance.
• Mulching – Place a 2 to 3 inch layer of compost or straw around the base of seedlings to help retain moisture in the soil and prevent weed growth.
Following these tips will ensure your zinnia seedlings get off to the best start. With the proper care and conditions, they’ll reward you with a summer full of bright, colorful blooms.
Caring for Newly Transplanted Zinnia Seedlings
Now that you have your zinnia seedlings, it’s time to get them in the ground.
The key to successfully transplanting seedlings is giving them the right amount of care and attention as they adjust to their new environment.
Choosing a Planting Site
Pick a spot in your garden that gets plenty of sunlight and has nutrient-rich, well-drained soil.
Zinnias thrive in sunny areas that see at least 6 to 8 hours of direct light per day.
The soil should be loose, crumbly, and able to hold moisture. If your soil is dense or clay-like, work in compost or other organic matter to improve drainage and aeration before planting.
Hardening Off Seedlings
A week before planting, start “hardening off” your zinnia seedlings by placing them outside in a sheltered location for a few hours each day.
This helps them get used to the outdoor conditions gradually. Bring them in at night.
Increase the time outside by a couple hours each day.
By the end of the week, they should be able to stay out overnight. This process prevents transplant shock by slowly acclimating the seedlings.
Transplanting Seedlings
When your seedlings are 3 to 4 inches tall and the weather is warm outside, it’s time to transplant.
Water the seedlings thoroughly before removing them from their containers.
Dig holes in your garden that are slightly larger than the root ball of each seedling.
Place one seedling in each hole and backfill the soil around the base of the plant.
Caring for Seedlings After Transplanting
Newly transplanted seedlings require diligent care as they become established.
Water the zinnias regularly, especially for the first week or two after transplanting. Make sure the soil stays consistently damp but not soggy.
Fertilize the seedlings 10 to 14 days after transplanting. Apply fertilizer at 1/2 the recommended strength. Watch for common pests and diseases and treat them promptly.
With the proper planting site, hardening off, and aftercare, your zinnia seedlings will thrive in their new home and provide you with a summer full of bright, colorful blooms. Happy gardening!
Conclusion
So there you have it, the inside scoop on when and how to plant those colorful zinnia seedlings for the best results. The key is not to rush it.
Wait until after the last frost when the soil has warmed up to at least 65 F.
Make sure you harden off those seedlings for a few days and plant them at the same depth as they were in the pots. Water thoroughly after planting and add a layer of mulch to help retain moisture in the soil.
With the right timing and care, you’ll have a summer garden filled with bright orange, red, and yellow zinnia blooms to enjoy for months.
What are you waiting for? Get out there and get your hands dirty – your zinnias will thank you!

