
Black-Eyed Susans, with their captivating golden petals and dark, enchanting centers, have long been a favorite amongst garden enthusiasts.
However, the secret to a truly breathtaking Black-Eyed Susan display lies not only in their inherent charm but also in the artful timing of their planting.
We will look into the critical importance of timing, revealing how it can unlock the full potential of these radiant blooms and bring your garden to life in ways you’ve never imagined.
Stick around as we unravel the secrets behind successful Black-Eyed Susan planting, setting the stage for a symphony of colors that will grace your garden with unparalleled splendor.
What are Black-Eyed Susans?

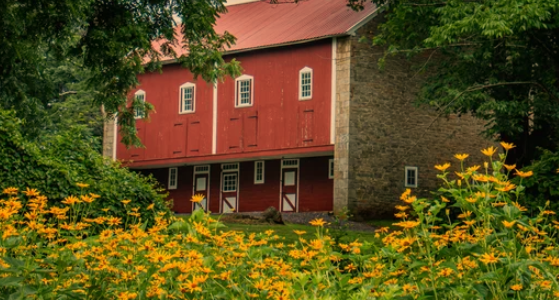
Black-Eyed Susans (Rudbeckia hirta) are vibrant and eye-catching flowering plants that belong to the sunflower family (Asteraceae).
Native to North America, these perennial wildflowers are cherished for their striking appearance and their ability to thrive in a variety of environments.
Named for their distinctive dark central cones surrounded by bright golden or sometimes orange or red petals, Black-Eyed Susans are a favorite in gardens, landscapes, and wildflower meadows.
Key Characteristics of Black-Eyed Susans:
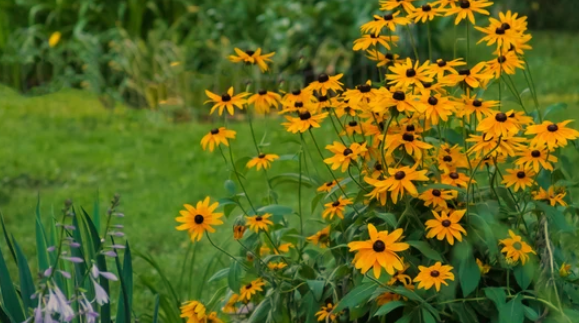
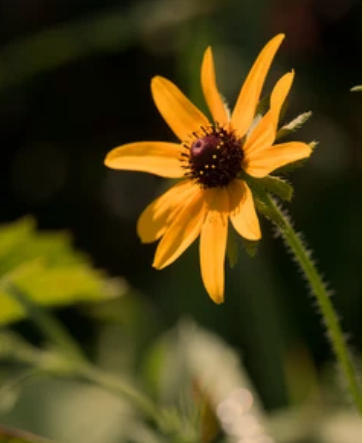
- Flower Structure: The classic Black-Eyed Susan flower consists of a prominent central cone (resembling an eye) made up of tightly packed disc florets, surrounded by ray florets in shades of yellow, gold, orange, or red.
- Plant Size: They typically grow to a height of 1 to 3 feet (30 to 90 cm), with a spread of about 1 to 2 feet (30 to 60 cm), depending on the variety.
- Leaves: The leaves are alternate, simple, and lance-shaped, with coarse hairs on the surface. They often have a rough texture, contributing to the species name “hirta,” which means “hairy.”
- Habitat and Growth: Black-Eyed Susans are adaptable and can thrive in a range of soil types, from sandy to clayey. They prefer full sun to light shade and are often found in meadows, prairies, roadsides, and open woodlands.
- Wildlife Attraction: The nectar-rich flowers of Black-Eyed Susans attract a variety of pollinators, including bees, butterflies, and other beneficial insects. Birds, such as finches, are also known to enjoy the seeds.
- Cultural and Symbolic Significance: Black-Eyed Susans hold cultural importance and are often associated with qualities such as encouragement, justice, and protection. They are also the state flower of Maryland.
Factors Shaping Black-Eyed Susan Growth
The successful cultivation of Black-Eyed Susans (Rudbeckia hirta) hinges significantly on the strategic timing of their planting.
This pivotal aspect of gardening is influenced by several critical factors that collectively determine the health and vitality of these captivating blooms.
Regional Climate Considerations
The geographical location of your garden plays a central role in determining the appropriate planting time for Black-Eyed Susans. Variations in temperature, precipitation, and sunlight between regions necessitate a nuanced understanding of local climate patterns. Whether you reside in a temperate, subtropical, or other climate zone, tailoring your planting schedule to your specific region is essential for optimal growth.
Frost Dates and Temperature Ranges:
Black-Eyed Susans are sensitive to frost, which can damage or even kill young plants. Understanding the average last frost date in your area is crucial in determining when it’s safe to plant. Planting too early exposes the delicate seedlings to potential frost damage, while planting too late may limit their establishment before colder temperatures arrive. Additionally, maintaining awareness of temperature ranges is vital throughout the growing season, as extreme heat or cold can impact plant health.
Soil Conditions and Preparation
The quality and composition of the soil in your garden significantly impact the success of Black-Eyed Susan growth.
Conducting a thorough soil assessment, including pH levels, drainage capabilities, and nutrient content, allows you to address any deficiencies before planting.
Well-draining soil rich in organic matter provides an optimal environment for root development and overall plant health.
Local Microclimates
Within larger geographical regions, there can be microclimates that differ slightly from the general climate.
Factors like elevation, proximity to water bodies, and the presence of structures can influence temperature and weather patterns.
Recognizing and adapting to these microclimates can help refine your planting timing for the best results.
Rainfall Patterns
The timing and frequency of rainfall in your area impact soil moisture levels, which are vital for the establishment of young Black-Eyed Susan plants. Planting during periods of expected rainfall or ensuring proper irrigation can aid in minimizing water stress during the critical initial growth stages.
Natural Phenology
Observing natural phenomena, such as the blooming of native plants or the emergence of certain insects, can serve as indicators of the appropriate planting time. Nature’s timing can provide valuable insights into the rhythm of your local ecosystem and guide your planting decisions.
The Perfect Planting Seasons for Black-Eyed Susans
Selecting the optimal planting season for Black-Eyed Susans is a nuanced process that significantly impacts the success of these charming blooms in your garden.
Carefully considering the advantages and timing associated with each season, you can create an environment that nurtures robust growth and stunning floral displays.
Here, we explore the merits of both spring and fall planting, offering insights to guide your horticultural endeavors.
Spring Planting
- Benefits and Advantages: Spring planting aligns with the awakening of nature, providing Black-Eyed Susans with abundant sunlight and gradually warming temperatures. This period of renewal stimulates vigorous growth, enabling young plants to establish their root systems and acclimate to their surroundings.
- Recommended Timing: The key to successful spring planting is to wait until after the threat of frost has passed. Depending on your location, this typically falls around the last frost date in your region. By planting at this juncture, you allow the soil to warm sufficiently, creating an inviting environment for seeds or young plants to thrive.
Fall Planting
- Advantages of Fall Planting: Fall presents a unique opportunity to establish Black-Eyed Susans ahead of the next growing season. Cooler temperatures reduce stress on young plants, while soil remains warm from the summer months. This combination encourages robust root development and prepares the plants for a vibrant spring display.
- Timing Considerations: Optimal fall planting timing is usually in late summer to early fall, well before the first frost. This timeframe grants ample time for the plants to establish a strong root system before winter sets in. As the surrounding vegetation starts to wane, Black-Eyed Susans take advantage of reduced competition for resources, resulting in enhanced growth.
Choosing between spring and fall planting depends on various factors, including your location, climate, and specific garden goals.
While spring planting jumpstarts growth and provides an early burst of color, fall planting offers the advantage of established root systems and a head start for the following year.
Whichever season you choose, meticulous planning and proper care post-planting will ultimately determine the vibrancy and longevity of your Black-Eyed Susan garden.
Black-Eyed Susan Planting: Step-by-Step Guide
Planting Black-Eyed Susans
This step-by-step guide provides a roadmap to help you navigate the intricacies of planting, ensuring that your efforts yield a flourishing and visually captivating garden display.
From choosing the perfect location to nurturing your blooms post-planting, each stage is essential in cultivating a thriving haven of natural beauty.
Step 1: Choosing the Right Location
- Sunlight Requirements: Select a site that receives full sun-to-light shade. Black-Eyed Susans thrive in sunlight-rich environments, enhancing their growth and blooming potential.
- Soil Conditions: Opt for well-draining soil with a pH level between 6.0 and 7.0. Amending the soil with compost or organic matter prior to planting improves soil structure and nutrient content.
Step 2: Soil Preparation and Amendment
- Soil Test: Conduct a soil test to assess its pH and nutrient levels. Adjustments can be made based on the test results to ensure optimal growing conditions.
- Amend the Soil: Incorporate compost or well-rotted manure to enrich the soil’s organic matter content. This enhances drainage, promotes root development, and fosters nutrient absorption.
Step 3: Plant Selection: Seeds vs. Nursery-Bought Plants
- Seeds: Sow seeds directly into the prepared soil after the last frost date. Follow seed packet instructions for proper depth and spacing.
- Nursery-Bought Plants: Purchase healthy nursery-grown plants, ensuring they have well-developed root systems. Transplant them into the garden after the last frost date.
Step 4: Planting Techniques and Spacing Guidelines
- Spacing: Space plants according to their mature size, usually around 12 to 18 inches apart. Adequate spacing encourages air circulation, reduces disease risk, and prevents overcrowding.
- Planting Depth: Plant seeds at the depth specified on the seed packet. When transplanting nursery-bought plants, ensure they are at the same depth as they were in their original containers.
Step 5: Mulching for Moisture Retention and Weed Suppression
- Mulch Application: Apply a layer of organic mulch, such as straw or wood chips, around the base of the plants. Mulch conserves moisture, regulates soil temperature, and minimizes weed growth.
Step 6: Caring for Black-Eyed Susans After Planting
- Watering: Keep the soil consistently moist, especially during the initial establishment period. Avoid overwatering, which can lead to root rot.
- Fertilization: Apply a balanced, slow-release fertilizer once or twice during the growing season to provide essential nutrients for healthy growth.
- Pest and Disease Management: Monitor plants for pests and diseases. Early detection and intervention with appropriate treatments will help protect your Black-Eyed Susans.
- Deadheading: Regularly remove faded or spent flowers by cutting them back to the nearest set of leaves. This practice encourages prolonged blooming and maintains a tidy appearance.
Step 7: Long-Term Maintenance
- Division and Propagation: Every few years, divide mature clumps to prevent overcrowding and rejuvenate plant vigor. Divisions can be replanted or shared with fellow gardeners.
- Overwintering: Apply a layer of mulch around the base of the plants before winter to protect the roots from freezing temperatures and ensure healthy regrowth in spring.
Caring for Black-Eyed Susans After Planting
The successful growth and longevity of your Black-Eyed Susans rely on attentive care and thoughtful maintenance post-planting. Here, we outline key care practices to uphold after planting, fostering a flourishing and visually stunning display.
1. Watering Regimen and Moisture Management:
- Establishment Period: During the initial weeks after planting, keep the soil consistently moist but not waterlogged. Regular watering helps young plants establish strong root systems.
- Deep Watering: Water deeply and infrequently rather than shallow, frequent watering. This encourages roots to grow deeply into the soil, promoting resilience and drought tolerance.
- Avoid Overwatering: Black-Eyed Susans prefer well-draining soil. Overwatering can lead to root rot and other fungal diseases. Allow the top inch of soil to dry before watering again.
2. Fertilization Schedules and Nutrient Requirements:
- Initial Fertilization: If not done during planting, apply a balanced, slow-release fertilizer in early spring to provide essential nutrients for the growing season.
- Avoid Excessive Fertilization: While Black-Eyed Susans are relatively low-maintenance, excessive fertilization can lead to excessive foliage growth at the expense of flowers. Follow recommended dosages.
3. Pest and Disease Management:
- Regular Inspection: Monitor your plants for signs of pests such as aphids, caterpillars, or leafhoppers, as well as any signs of disease such as powdery mildew.
- Natural Solutions: Consider using natural remedies like neem oil or insecticidal soap for pest control. Proper spacing and good air circulation can help prevent disease.
4. Deadheading and Promoting Prolonged Flowering:
- Regular Deadheading: Remove spent or faded flowers by cutting them back to the nearest set of leaves. This practice encourages continuous blooming and redirects the plant’s energy into producing more flowers.
- Seasonal Pruning: In late summer or early fall, trim back leggy growth to maintain a compact and tidy appearance.
5. Support and Staking:
- Tall Varieties: If growing taller cultivars, consider staking or providing support to prevent bending or flopping, especially during heavy rain or strong winds.
6. Division and Propagation:
- Dividing Clumps: Every few years, divide mature clumps in early spring or fall to rejuvenate the plant and prevent overcrowding. Replant divisions or share them with fellow gardeners.
7. Overwintering Techniques and Protection:
- Mulching: Apply a layer of mulch around the base of the plants in late fall. Mulch helps protect the roots from freezing temperatures and provides insulation against winter weather.
The factors that influence their growth, embracing the ideal planting seasons, and meticulously tending to their needs after planting, we’ve embarked on a path toward creating a haven of beauty and vitality.
The act of nurturing these flowers extends beyond the physical realm it connects us to the rhythm of seasons, the delicate interplay of sunlight and rain, and the resilience of life itself.

