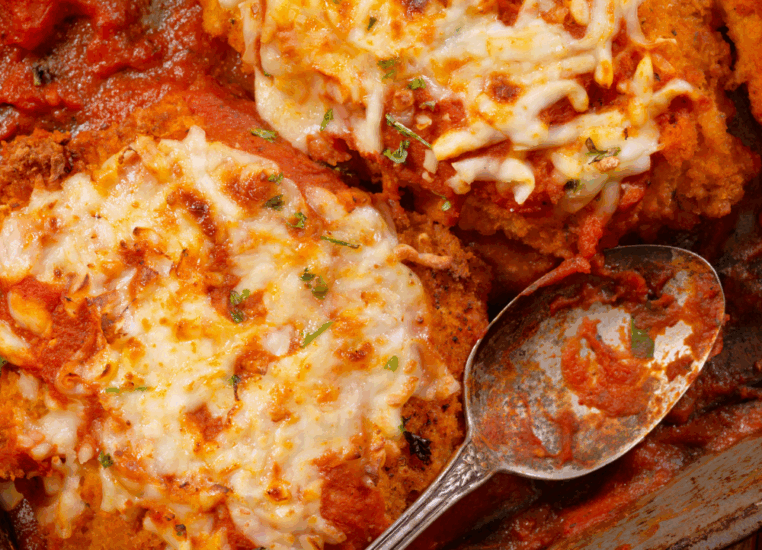
I’ve been making Chicken Parmesan for years, and I’m thrilled to share my perfected recipe with you today!
This classic Italian-American comfort food features crispy breaded chicken cutlets topped with marinara sauce and melted cheese.
My version guarantees a crispy crust that doesn’t get soggy, juicy chicken that stays tender, and the perfect balance of sauce and cheese.
We all love this dish in my home because it’s both impressive enough for company and simple enough for a weeknight dinner.
Whether you’re a beginner cook or a seasoned pro, this recipe will give you restaurant-quality results every time. So let’s get cooking!
Here’s Why You Love This Chicken Parmesan Recipe
I’m always looking for recipes that deliver big flavor without complicated techniques, and this Chicken Parmesan definitely fits the bill!
The combination of crispy, golden-brown chicken with tangy marinara and gooey melted cheese creates a comfort food masterpiece that’s hard to resist.
My family requests this dish at least twice a month because it’s so satisfying and delicious.
But what makes my version special is the technique that keeps the chicken crispy, even with sauce and cheese on top.
Because nobody wants soggy chicken parm!

What Makes This Recipe Special:
- The chicken stays crispy thanks to my special breading technique
- Perfect balance of sauce and cheese (not too much, not too little)
- Simple ingredients you probably already have in your kitchen
- Ready in under an hour from start to finish
- Makes amazing leftovers for lunch the next day
- Works perfectly with pasta or as a sandwich filling
Therefore, I’ve tested this recipe dozens of times to get it just right.
The result is a foolproof method that delivers restaurant-quality Chicken Parmesan every single time.
My secret?
Pounding the chicken to an even thickness and using the right amount of sauce so the breading stays crisp.
Ingredients You’ll Need
I love that this impressive dish requires mostly pantry staples.
However, using fresh mozzarella and Parmesan makes a big difference in flavor.
Nonetheless, pre-shredded cheese will work in a pinch if that’s what you have on hand.

| Ingredient Category | Ingredients | Notes |
| For the Chicken | 2 large boneless, skinless chicken breasts (about 1½ pounds) Salt and freshly ground black pepper |
Cut each breast in half lengthwise to make 4 cutlets, then pound to ⅓-inch thickness |
| For the Breading | ½ cup all-purpose flour 2 large eggs 1 cup Italian breadcrumbs ½ cup grated Parmesan cheese 1 tsp garlic powder |
Panko breadcrumbs can be substituted for extra crispiness |
| For Cooking | ½ cup olive oil (or vegetable oil) | For pan-frying the chicken |
| For Topping | 1½ cups marinara sauce 1 cup shredded mozzarella cheese ¼ cup grated Parmesan cheese ¼ cup fresh basil leaves, chopped |
Homemade or good-quality store-bought marinara works well |
| For Serving (Optional) | Cooked spaghetti or other pasta Extra marinara sauce Grated Parmesan |
Serve chicken over pasta for a complete meal |
Ingredient Tips:
I always recommend using freshly grated Parmesan cheese rather than the pre-grated kind in the green container.
Because fresh Parmesan has much better flavor and melts beautifully.
My other tip?
Room temperature eggs coat the chicken more evenly than cold ones straight from the refrigerator.
Kitchen Equipment You’ll Need
- Meat mallet or rolling pin – For pounding chicken to even thickness
- Three shallow bowls – For the dredging station (flour, eggs, breadcrumbs)
- Large skillet – For pan-frying the chicken cutlets
- Baking dish – 9×13 inch works perfectly
- Tongs – For flipping and handling the chicken
- Instant-read thermometer – To ensure chicken reaches 165°F
- Paper towels – For draining excess oil
Preparing the Chicken
The first step to perfect Chicken Parmesan is properly preparing the chicken breasts.
This is crucial because evenly thick cutlets cook more uniformly and tender.
Step 1: Slice and Pound the Chicken
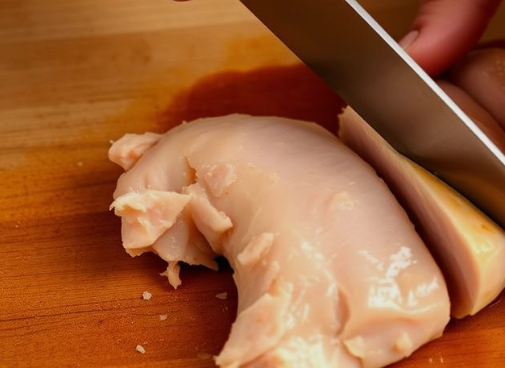
- Place your chicken breasts on a cutting board.
- With your hand flat on top of the chicken, use a sharp knife to slice horizontally through the middle of the breast, creating two even pieces.
- Place the chicken pieces between two sheets of plastic wrap.
- Using a meat mallet or rolling pin, gently pound the chicken to an even ⅓-inch thickness.
Step 2: Season the Chicken
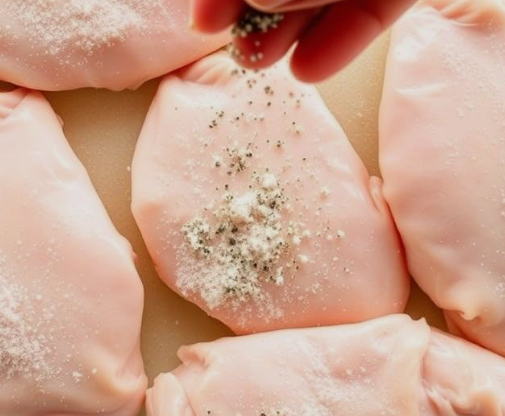
After pounding, it’s important to season your chicken well. I like to season directly on the meat rather than mixing salt into the flour because it ensures even flavor throughout.
- Remove the plastic wrap and pat the chicken dry with paper towels.
- Season both sides generously with salt and freshly ground black pepper.
- Let the chicken sit for 5 minutes to absorb the seasoning.
This simple step makes a huge difference in the final flavor of your Chicken Parmesan!
The Perfect Breading Technique
The key to crispy Chicken Parmesan is all in the breading technique. I’ve learned through many trials that setting up a proper dredging station and following the right order makes all the difference.
Step 1: Set Up Dredging Station
Arrange three shallow bowls in a row:
- Bowl 1: ½ cup all-purpose flour mixed with a pinch of salt and pepper
- Bowl 2: 2 large eggs, beaten until frothy
- Bowl 3: 1 cup Italian breadcrumbs mixed with ½ cup grated Parmesan and 1 tsp garlic powder
Step 2: Dredge the Chicken
The order matters here! Follow these steps for each chicken cutlet:
- Dredge chicken in flour, shaking off excess
- Dip into beaten eggs, allowing excess to drip off
- Press firmly into breadcrumb mixture, coating both sides
- Place breaded chicken on a plate and let rest for 5 minutes (this helps the coating stick better)
Pro Tip: The “Dry Hand, Wet Hand” Method
To avoid the dreaded “breaded fingers” mess:
- Use your left hand as your “dry hand” for flour and breadcrumbs
- Use your right hand as your “wet hand” for the egg mixture
- This keeps your hands cleaner and prevents the breading from clumping
I learned this trick from a chef friend, and it’s been a game-changer for all my breaded recipes!
Cooking Your Chicken Parmesan
Now comes the exciting part – cooking your perfectly breaded chicken cutlets! We’ll pan-fry them first to get that golden crust, then finish them in the oven with sauce and cheese.
Step 1: Pan-Fry the Chicken

- Heat ½ cup olive oil in a large skillet over medium heat until shimmering but not smoking
- Carefully add chicken cutlets (don’t overcrowd the pan – work in batches if needed)
- Cook for 3-4 minutes on each side until golden brown
- Transfer to a paper towel-lined plate to drain excess oil
Important: The chicken doesn’t need to be fully cooked at this stage – it will finish cooking in the oven. We’re just looking for a beautiful golden crust!
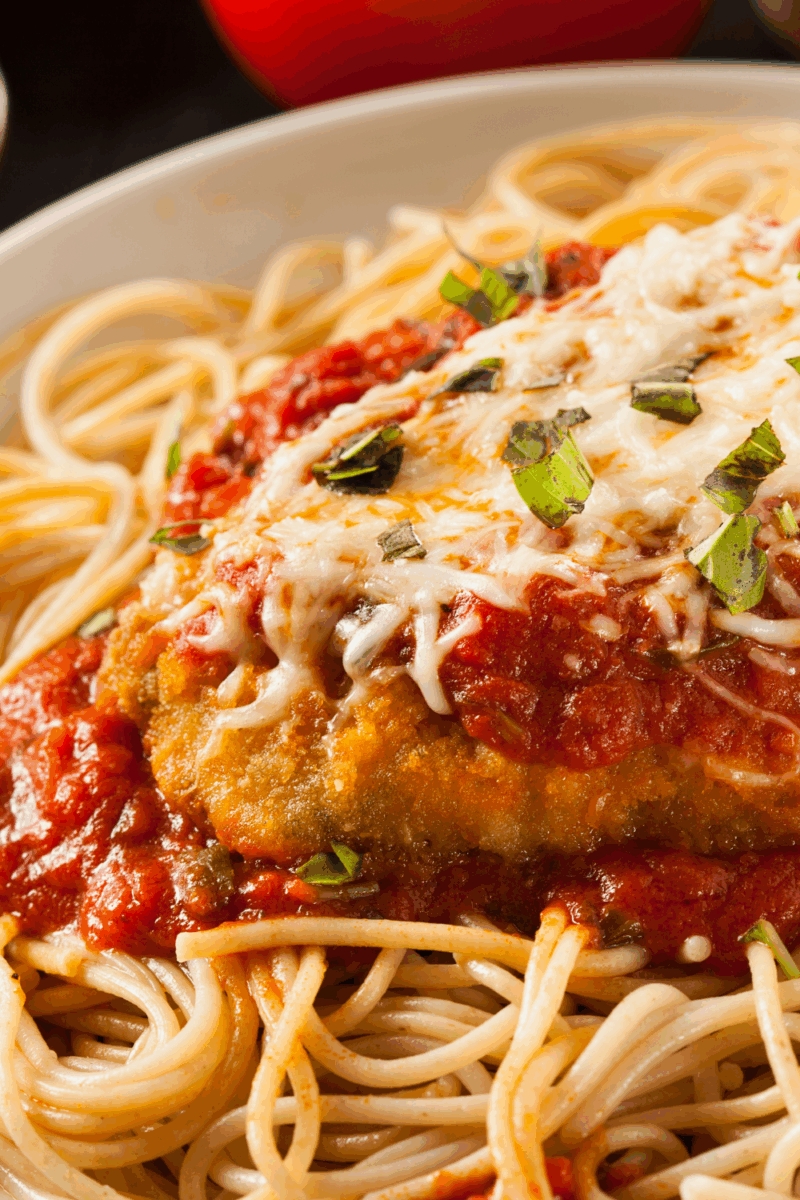
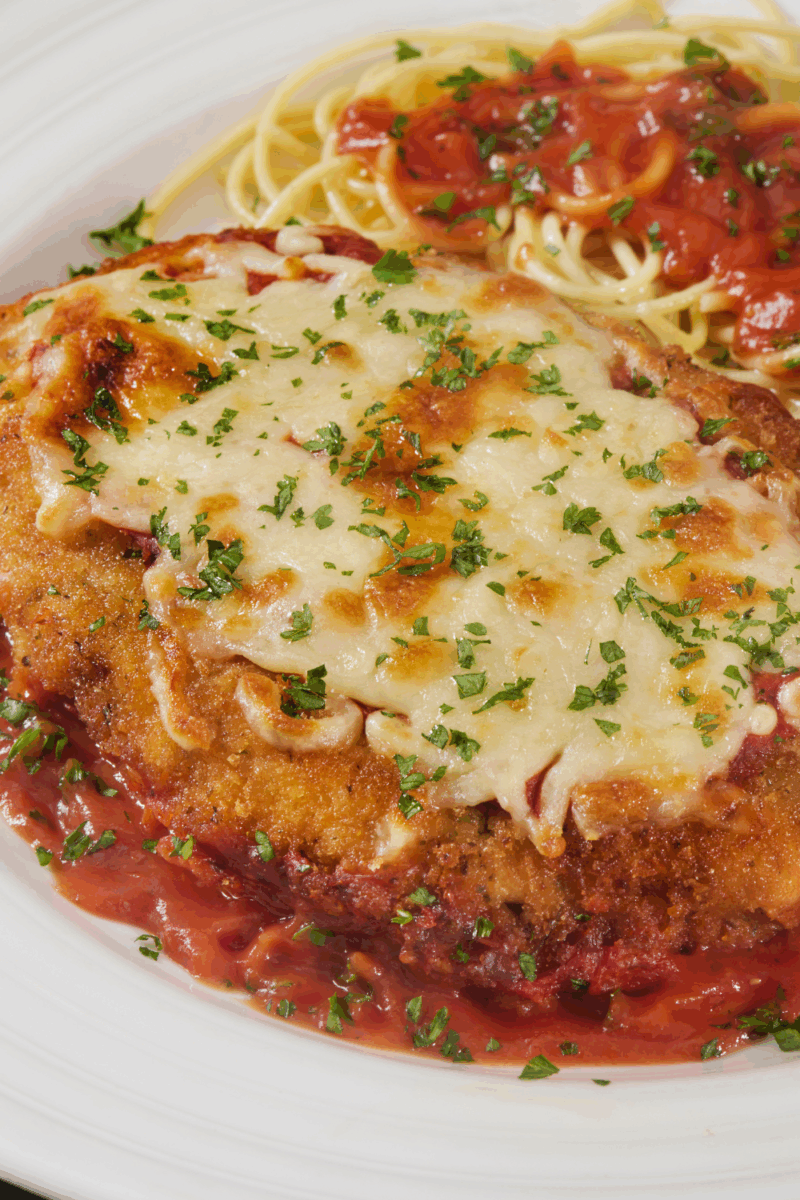
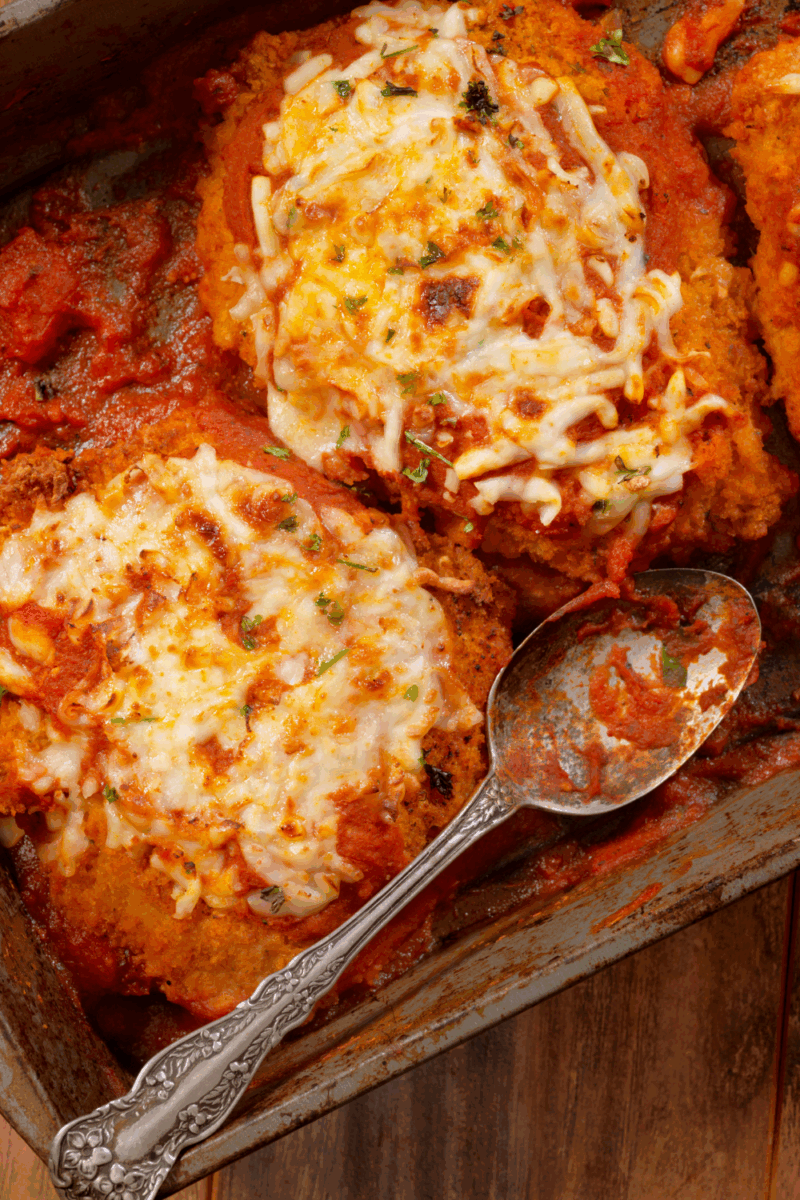
Step 2: Assemble and Bake

- Preheat your oven to 425°F
- Spread ½ cup marinara sauce in the bottom of a 9×13 baking dish
- Arrange the fried chicken cutlets in the dish
- Top each cutlet with about 2 tablespoons of marinara sauce (not too much!)
- Sprinkle with mozzarella and remaining Parmesan cheese
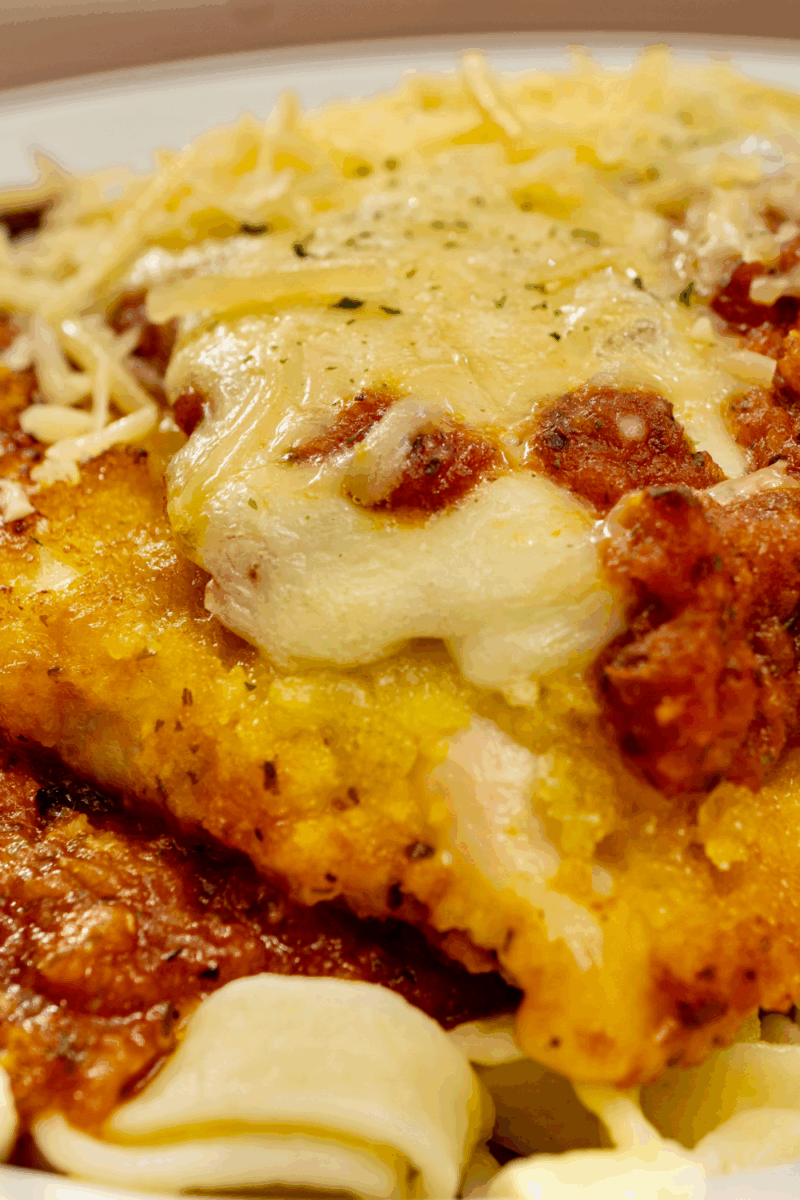
- Bake for 15-20 minutes until cheese is melted and bubbly, and chicken reaches 165°F internal temperature
- Optional: Broil for 1-2 minutes at the end for golden cheese spots
“The secret to non-soggy chicken parm is using just enough sauce to flavor the chicken without drowning it. This keeps the breading crispy while still giving you that delicious marinara flavor!”
Serving Your Chicken Parmesan
Classic Serving Ideas
Chicken Parmesan is versatile and pairs well with many sides. Here are my favorite ways to serve it:
- Over pasta: Serve on a bed of spaghetti or fettuccine with extra marinara sauce
- With a salad: A simple Caesar or arugula salad with lemon dressing balances the richness
- Garlic bread: Perfect for soaking up extra sauce
- Roasted vegetables: Asparagus, broccoli, or zucchini make great sides
Creative Twists
Want to try something different? Here are some fun variations:
- Chicken Parm Sandwich: Place between toasted garlic bread or a ciabatta roll
- Low-Carb Option: Serve with roasted spaghetti squash instead of pasta
- Chicken Parm Sliders: Use smaller pieces of chicken on dinner rolls for appetizers
- Family Style: Place the baking dish in the center of the table and let everyone serve themselves
However you choose to serve it, don’t forget to garnish with fresh basil for that pop of color and fresh flavor!
Storage and Reheating Tips
Best Chicken Parmesan Recipe
Storing Leftovers
One of the best things about Chicken Parmesan is that it makes excellent leftovers! Here’s how to store it properly:
- Refrigerator: Store in an airtight container for up to 3 days
- Freezer: Wrap individual portions in foil, then place in freezer bags for up to 2 months
- Tip: Store chicken and pasta separately if possible for best texture when reheating
Reheating for Best Results
To maintain that crispy texture when reheating:
- Oven (Best Method): Preheat to 350°F, place chicken on a baking sheet, and heat for 10-15 minutes until warmed through
- Microwave (Quick Method): Use 50% power in 30-second intervals to prevent rubbery chicken
- Air Fryer: 3-4 minutes at 350°F gives amazing crispy results
- Avoid: Reheating with additional sauce, as this will make the breading soggy
My personal preference is definitely the oven method because it helps restore some of that wonderful crispiness that makes Chicken Parmesan so special!
Pro Tips for Perfect Chicken Parmesan
For the Crispiest Chicken
- Pat chicken completely dry before seasoning
- Let breaded chicken rest 5 minutes before frying (helps coating adhere)
- Make sure oil is hot before adding chicken (test with a few breadcrumbs)
- Don’t flip the chicken too early – wait for that golden color
- Use minimal sauce on top to prevent sogginess
For the Juiciest Chicken
- Pound to even thickness for uniform cooking
- Don’t overcook during the frying stage
- Use an instant-read thermometer to check for doneness (165°F)
- Let rest 5 minutes after baking before serving
- If using thicker chicken breasts, consider brining them first
Common Mistakes to Avoid
- Using cold chicken straight from the refrigerator
- Skipping the pounding step (leads to uneven cooking)
- Overcrowding the pan when frying
- Using too much sauce (makes the breading soggy)
- Not letting the oil get hot enough before frying
- Cutting into the chicken immediately after cooking
“The difference between good and great Chicken Parmesan is all in the details – taking time to pound the chicken evenly, getting the oil temperature just right, and being careful with the amount of sauce you use.”
Delicious Variations to Try
While classic Chicken Parmesan is amazing, there are several tasty variations you might want to experiment with. Here are some of my favorites:
Healthier Options

- Baked Instead of Fried: Skip the pan-frying and bake breaded chicken at 425°F for 15 minutes before adding toppings
- Air Fryer Method: Cook breaded cutlets in air fryer at 375°F for 10-12 minutes
- Whole Wheat Breadcrumbs: Substitute for regular breadcrumbs
- Reduced-Fat Cheese: Use part-skim mozzarella
- Zucchini Noodles: Serve over spiralized zucchini instead of pasta
Flavor Twists

- Spicy Chicken Parm: Add red pepper flakes to the breadcrumbs and sauce
- Pesto Chicken Parm: Use pesto instead of or alongside marinara
- Caprese Style: Top with fresh tomato slices and fresh mozzarella
- Alfredo Chicken Parm: Use Alfredo sauce instead of marinara
- Stuffed Chicken Parm: Butterfly thicker chicken breasts and stuff with cheese before breading
Different Cheeses to Try

- Provolone: Adds a sharper flavor than mozzarella
- Fontina: Creates an extra creamy, melty topping
- Smoked Mozzarella: Adds a subtle smoky flavor
- Burrata: Place a ball on top after baking for a creamy center
- Four Cheese Blend: Mix mozzarella, provolone, Parmesan, and Asiago
Frequently Asked Questions
Can I make Chicken Parmesan ahead of time?
Yes! You have several make-ahead options:
- Prep the components: Bread the chicken and store in the refrigerator (separated by parchment paper) for up to 24 hours before cooking.
- Partially cook: Fry the chicken but don’t bake with sauce and cheese. Refrigerate for up to 2 days, then assemble and bake when ready to serve.
- Fully cook: Complete the entire recipe, refrigerate, and reheat in a 350°F oven for 15-20 minutes until hot.
Why is my breading falling off the chicken?
This is a common issue with several possible causes:
- The chicken was too wet before breading (always pat it dry)
- You didn’t press the breadcrumbs firmly enough onto the chicken
- The breaded chicken wasn’t allowed to rest before frying
- The oil wasn’t hot enough when you added the chicken
- You flipped the chicken too soon or too often
My top tip: After breading, let the chicken rest for 5-10 minutes before frying. This gives the coating time to adhere properly.
Can I use chicken thighs instead of breasts?
Absolutely! Boneless, skinless chicken thighs work great for Chicken Parmesan. They’re naturally more flavorful and juicy than breasts. Because thighs are smaller and have a more uniform thickness, you might not need to pound them as much. Just trim any excess fat and proceed with the recipe as written. The cooking time might be slightly different, so always use an instant-read thermometer to check for doneness (165°F).
What’s the difference between Chicken Parmesan and Chicken Parmigiana?
There’s no difference! “Chicken Parmigiana” is the Italian name, while “Chicken Parmesan” or “Chicken Parm” are the American shortened versions of the same dish. All refer to breaded chicken cutlets topped with tomato sauce and melted cheese. The dish actually originated among Italian immigrants in America, making it truly Italian-American cuisine rather than authentic Italian.
Chicken Parmesan Recipe Card
Love this recipe? Save it for later!
Pin this recipe to your favorite Pinterest board to make it again and again. Your family will thank you!
The Best Chicken Parmesan
| 20 minutes | 25 minutes | 45 minutes |
| 4 servings | 470 per serving | Intermediate |
Ingredients:
- 2 large boneless, skinless chicken breasts (about 1½ pounds)
- Salt and freshly ground black pepper
- ½ cup all-purpose flour
- 2 large eggs
- 1 cup Italian breadcrumbs
- ½ cup grated Parmesan cheese, plus ¼ cup for topping
- 1 tsp garlic powder
- ½ cup olive oil, for frying
- 1½ cups marinara sauce
- 1 cup shredded mozzarella cheese
- ¼ cup fresh basil leaves, chopped
Instructions:
- Slice chicken breasts horizontally to create 4 cutlets. Pound to ⅓-inch thickness.
- Season chicken with salt and pepper on both sides.
- Set up dredging station: flour in first bowl, beaten eggs in second bowl, and breadcrumbs mixed with ½ cup Parmesan and garlic powder in third bowl.
- Dredge each chicken piece in flour, then egg, then breadcrumb mixture, pressing to adhere.
- Let breaded chicken rest for 5 minutes.
- Heat oil in a large skillet over medium heat. Fry chicken until golden brown, about 3-4 minutes per side.
- Preheat oven to 425°F.
- Spread ½ cup marinara in a 9×13 baking dish. Arrange chicken in dish.
- Top each piece with remaining marinara, mozzarella, and remaining Parmesan.
- Bake for 15-20 minutes until cheese is melted and chicken reaches 165°F.
- Garnish with fresh basil before serving.
Notes:
For extra crispy chicken, don’t use too much sauce on top. You can serve additional warm marinara on the side. This recipe pairs perfectly with spaghetti or a side salad.
Why You’ll Love This Chicken Parmesan Recipe
I hope you enjoy making this Chicken Parmesan as much as I do! It’s truly one of those recipes that brings everyone to the table with smiles on their faces. The combination of crispy chicken, tangy sauce, and melty cheese is simply irresistible.
What makes this recipe special is the attention to detail – pounding the chicken for even cooking, the perfect breading technique, and being careful not to use too much sauce. These little steps make a big difference in the final result.
Therefore, I encourage you to try this recipe the next time you want to impress your family or friends with a delicious homemade meal. Because once you master this Chicken Parmesan, you’ll have a go-to dish that never disappoints!
Did you make this recipe?
I’d love to see your creation! Tag me on social media or leave a comment below to let me know how it turned out.