I’ve always been a fan of working smarter, not harder in the kitchen.
As someone who juggles work, family, and a million other responsibilities, I’ve found that batch cooking is my secret weapon for maintaining sanity during busy weeks.
Making 12 recipes to make in bulk has completely transformed my approach to meal planning.
Instead of scrambling to figure out dinner every night, I now dedicate a few hours on the weekend to prepare meals that will last us for days.
Not only does this save me precious time during hectic weeknights, but it also reduces food waste and helps our grocery budget stretch further.
In this post, I’m sharing my favorite bulk recipes that freeze beautifully, reheat well, and most importantly, taste delicious even after being stored.
So grab your largest pots and pans, clear some freezer space, and let’s get cooking!
Jump to Your Favorite 12 Recipes to Make in Bulk
- Hearty Beef and Bean Chili
- Freezer-Friendly Breakfast Burritos
- Slow Cooker Chicken Curry
- Classic Beef Lasagna
- Versatile Pulled Pork
- Sweet Potato Black Bean Enchiladas
- Roasted Tomato Soup
- Italian Meatballs
- Freezer-Friendly Mac and Cheese
- Spinach and Ricotta Stuffed Shells
- Marinated Chicken Thighs
- No-Bake Energy Bites
My weekend batch cooking session a few hours of work for a week of easy meals!
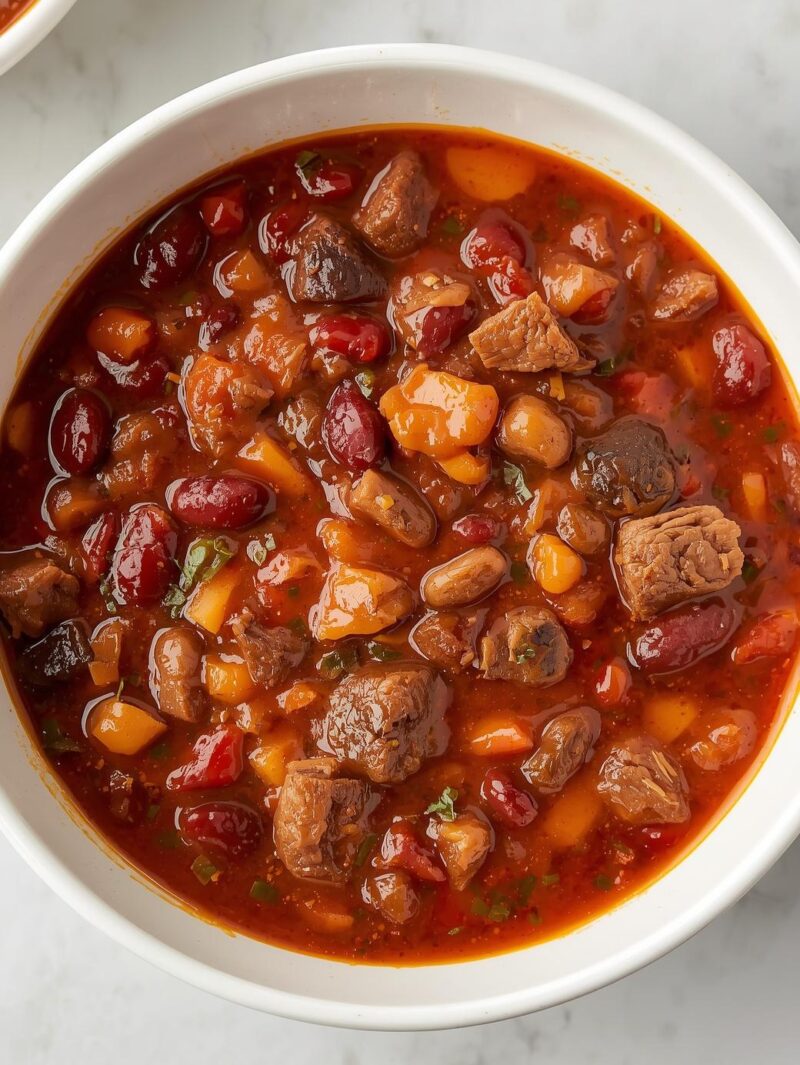
1. Beef and Bean Chili: A Staple Among 12 Recipes to Make in Bulk
Chili is my go-to bulk recipe because it actually tastes better after a day or two in the fridge as the flavors have time to meld together.
So, I make a massive pot of this hearty beef and bean chili at least once a month.
It’s incredibly versatile we enjoy it on its own, over rice, with baked potatoes, or as a topping for nachos.
The best part? It freezes beautifully for up to 3 months.
| Ingredient | Quantity |
| Ground beef | 2 pounds |
| Yellow onions, diced | 2 large |
| Bell peppers, diced | 2 (any color) |
| Garlic, minced | 6 cloves |
| Kidney beans, drained and rinsed | 2 (15 oz) cans |
| Black beans, drained and rinsed | 2 (15 oz) cans |
| Diced tomatoes | 2 (28 oz) cans |
| Tomato paste | 1 (6 oz) can |
| Beef broth | 2 cups |
| Chili powder | 3 tablespoons |
| Cumin | 2 tablespoons |
| Oregano | 1 tablespoon |
| Paprika | 1 tablespoon |
| Salt and pepper | To taste |
Instructions:
- In a large pot or Dutch oven, brown the ground beef over medium-high heat until no longer pink, about 7-8 minutes. Drain excess fat.
- Add diced onions and bell peppers to the pot and cook until softened, about 5 minutes.
- Add minced garlic and cook until fragrant, about 1 minute.
- Stir in chili powder, cumin, oregano, and paprika, cooking for 30 seconds to bloom the spices.
- Add tomato paste and stir to coat the meat and vegetables.
- Pour in diced tomatoes with their juice and beef broth.
- Add kidney beans and black beans, stirring to combine.
- Bring to a boil, then reduce heat to low and simmer, partially covered, for at least 1 hour (2-3 hours is even better).
- Season with salt and pepper to taste.
Storage Tips:
Let the chili cool completely before transferring to airtight containers.
It will keep in the refrigerator for up to 5 days or in the freezer for up to 3 months.
I like to portion it into meal-sized containers for easy thawing.
To reheat, thaw overnight in the refrigerator if frozen, then warm on the stovetop or in the microwave until heated through.
Pro tip: Freeze individual portions in silicone muffin cups, then pop them out and store in a freezer bag.
This way, you can grab exactly how much you need for a single serving or to add to other dishes.
2. Freezer-Friendly Breakfast Burritos
The mornings are often the most hectic part of my day, which is why I’m obsessed with these make-ahead breakfast burritos.
I can make a batch of 12-16 burritos in one go, and they’re ready to grab, heat, and eat on busy mornings.
They’re also incredibly customizable you can add whatever proteins, veggies, and cheeses your family enjoys.

| Ingredient | Quantity |
| Large flour tortillas | 12-16 |
| Eggs | 18 |
| Milk | 1/4 cup |
| Breakfast sausage or bacon | 1 pound |
| Russet potatoes, diced small | 2 medium |
| Bell peppers, diced | 2 |
| Onion, diced | 1 medium |
| Shredded cheddar cheese | 2 cups |
| Salt and pepper | To taste |
| Hot sauce (optional) | To taste |
Instructions:
- Cook breakfast meat according to package directions, then chop into small pieces.
- In a large skillet, cook diced potatoes in a bit of oil until crispy and golden, about 10-12 minutes.
- Add diced peppers and onions to the potatoes and cook until softened, about 5 minutes more.
- In a large bowl, whisk together eggs and milk with salt and pepper.
- In a separate skillet, scramble the eggs until just set but still slightly moist (they’ll cook more when reheated).
- Warm tortillas slightly to make them more pliable.
- Assemble burritos by placing a portion of eggs, meat, potato mixture, and cheese in the center of each tortilla.
- Add hot sauce if desired.
- Fold in the sides of the tortilla, then roll up tightly.
- Wrap each burrito in parchment paper, then in aluminum foil.
Storage Tips:
Place wrapped burritos in a freezer bag and freeze for up to 3 months.
To reheat, remove foil but keep the parchment paper, and microwave for 2-3 minutes, flipping halfway through.
For a crispier exterior, remove from parchment after microwaving and finish in a skillet or toaster oven.
Time-saving tip: Label each burrito with the contents using a permanent marker on the foil.
This is especially helpful if you make different varieties to accommodate family preferences.
3. Slow Cooker Chicken Curry
This slow cooker chicken curry is one of my favorite dishes to make in bulk because it’s so flavorful and comforting.
The slow cooking process allows the spices to develop deep flavor, and the recipe scales up beautifully.
I often double this recipe and freeze half for those nights when I need a quick dinner solution.

| Ingredient | Quantity |
| Boneless, skinless chicken thighs | 3 pounds |
| Yellow onions, diced | 2 large |
| Garlic, minced | 6 cloves |
| Fresh ginger, grated | 2 tablespoons |
| Curry powder | 3 tablespoons |
| Garam masala | 1 tablespoon |
| Ground turmeric | 1 teaspoon |
| Red pepper flakes | 1/2 teaspoon (adjust to taste) |
| Diced tomatoes | 1 (28 oz) can |
| Coconut milk | 2 (13.5 oz) cans |
| Bell peppers, diced | 2 |
| Carrots, sliced | 3 medium |
| Frozen peas | 1 cup |
| Salt | To taste |
| Fresh cilantro, chopped | 1/2 cup |
Instructions:
- Cut chicken thighs into 1-inch pieces.
- In a large slow cooker, combine onions, garlic, ginger, curry powder, garam masala, turmeric, and red pepper flakes.
- Add chicken pieces and stir to coat with spices.
- Pour in diced tomatoes with their juice.
- Cook on low for 4-5 hours.
- Add bell peppers and carrots, then continue cooking for 1 hour.
- Stir in coconut milk and frozen peas, then cook for an additional 30 minutes.
- Season with salt to taste.
- Garnish with fresh cilantro before serving.
Storage Tips:
Allow curry to cool completely before transferring to airtight containers.
It will keep in the refrigerator for up to 4 days or in the freezer for up to 3 months.
The curry tastes even better the next day as the flavors continue to develop. Serve with rice, naan bread, or cauliflower rice for a low-carb option.
Freezing tip: Freeze the curry without the coconut milk, then add it when reheating for the best texture.
If you do freeze with coconut milk, stir well when reheating as it may separate slightly.
4. Classic Beef Lasagna
Lasagna is the best make-ahead comfort food and definitely belongs in any collection of 12 recipes to make in bulk.
I often make two or three lasagnas at once one for dinner that night and the others for the freezer.
It’s a bit of work upfront, but having a homemade lasagna ready to go in the freezer is worth every minute of preparation.

| Ingredient | Quantity |
| Lasagna noodles | 1 pound |
| Ground beef | 2 pounds |
| Italian sausage, casings removed | 1 pound |
| Yellow onion, diced | 1 large |
| Garlic, minced | 6 cloves |
| Crushed tomatoes | 2 (28 oz) cans |
| Tomato paste | 2 (6 oz) cans |
| Dried oregano | 1 tablespoon |
| Dried basil | 1 tablespoon |
| Sugar | 1 teaspoon |
| Ricotta cheese | 32 oz |
| Eggs | 2 |
| Fresh parsley, chopped | 1/4 cup |
| Mozzarella cheese, shredded | 4 cups |
| Parmesan cheese, grated | 1 cup |
| Salt and pepper | To taste |
Instructions:
- Cook lasagna noodles according to package directions, but keep them slightly undercooked. Drain and lay flat on oiled parchment paper to prevent sticking.
- In a large pot, brown ground beef and Italian sausage over medium-high heat until no longer pink, about 8 minutes. Drain excess fat.
- Add diced onion to the meat and cook until softened, about 5 minutes.
- Add minced garlic and cook until fragrant, about 1 minute.
- Stir in crushed tomatoes, tomato paste, oregano, basil, sugar, salt, and pepper.
- Simmer sauce for at least 30 minutes (longer is better).
- In a bowl, mix ricotta cheese, eggs, parsley, and 1/2 cup of Parmesan cheese.
- Preheat oven to 375°F.
- To assemble: Spread 1 cup of meat sauce in the bottom of a 9×13 inch baking dish. Arrange a layer of noodles over the sauce. Spread 1/3 of the ricotta mixture over the noodles, top with 1/4 of the mozzarella, then 1/3 of the remaining meat sauce. Repeat layers twice.
- Top with remaining noodles, sauce, mozzarella, and Parmesan.
- Cover with foil (spray the underside with cooking spray to prevent sticking to the cheese).
- Bake for 25 minutes, then remove foil and bake for an additional 25 minutes until bubbly and browned.
- Let stand for 15 minutes before cutting.
Storage Tips:
For freezing, assemble the lasagna but do not bake it. Cover tightly with plastic wrap, then aluminum foil, and freeze for up to 3 months.
Thaw overnight in the refrigerator before baking as directed, adding an extra 15 minutes to the cooking time.
Alternatively, bake from frozen by adding about 30-45 minutes to the cooking time (keep covered with foil for the first hour).
Make-ahead tip: Use disposable aluminum pans for lasagnas you plan to freeze.
This frees up your regular baking dishes and makes it easier to give a lasagna to a friend or family member in need of a home-cooked meal.
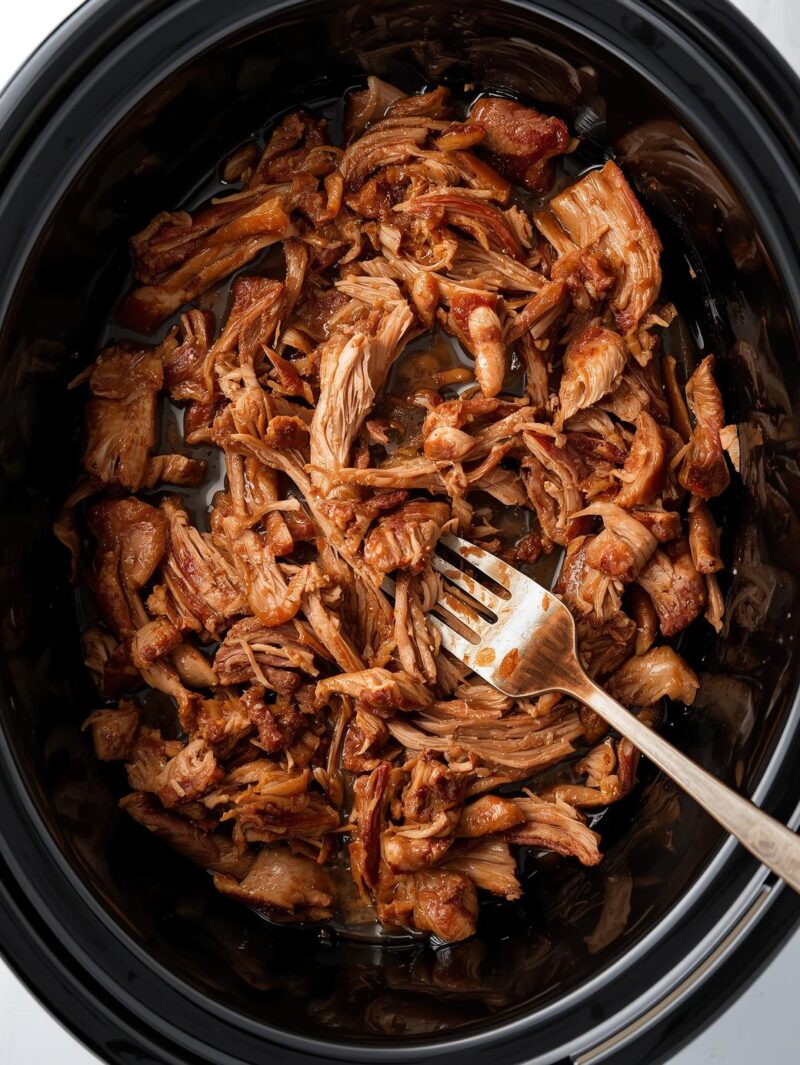
5. Versatile Pulled Pork
Pulled pork is one of the most versatile proteins to make in bulk.
I can use it in sandwiches, tacos, quesadillas, salads, and more.
Making a large batch in the slow cooker is practically effortless, and the results are always delicious.
This is definitely a staple in my rotation of 12 recipes to make in bulk.
| Ingredient | Quantity |
| Pork shoulder (Boston butt) | 5-6 pounds |
| Brown sugar | 1/4 cup |
| Paprika | 2 tablespoons |
| Garlic powder | 1 tablespoon |
| Onion powder | 1 tablespoon |
| Cumin | 1 tablespoon |
| Mustard powder | 1 tablespoon |
| Salt | 1 tablespoon |
| Black pepper | 1 tablespoon |
| Apple cider vinegar | 1/3 cup |
| Chicken broth | 1 cup |
| Worcestershire sauce | 2 tablespoons |
| Liquid smoke (optional) | 1 teaspoon |
| BBQ sauce (for serving) | 2 cups |
Instructions:
- Trim excess fat from pork shoulder (but leave some for flavor).
- In a bowl, mix brown sugar, paprika, garlic powder, onion powder, cumin, mustard powder, salt, and pepper.
- Rub the spice mixture all over the pork shoulder, pressing it into the meat.
- Place the seasoned pork in a large slow cooker.
- Mix apple cider vinegar, chicken broth, Worcestershire sauce, and liquid smoke (if using) in a separate bowl, then pour around (not over) the pork to avoid washing off the rub.
- Cover and cook on low for 8-10 hours, or until the meat easily shreds with a fork.
- Remove the pork from the slow cooker and let rest for 10 minutes.
- Shred the meat using two forks, discarding any large pieces of fat.
- Skim the fat from the cooking liquid, then return the shredded pork to the slow cooker with about 1 cup of the defatted cooking liquid.
- Mix in BBQ sauce if desired, or keep it plain for more versatility.
Storage Tips:
Pulled pork can be refrigerated for up to 4 days or frozen for up to 3 months.
I recommend freezing it in meal-sized portions without BBQ sauce for maximum versatility.
To reheat, thaw overnight in the refrigerator if frozen, then warm in a skillet with a splash of water or broth to keep it moist. Add sauce after reheating if desired.
Serving idea: Create a “pulled pork bar” with different sauces and toppings like coleslaw, pickled onions, and different types of buns. This is perfect for casual entertaining!
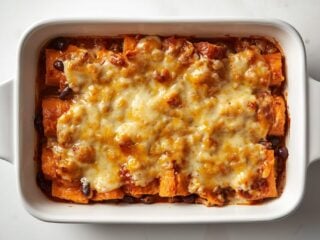
6. Sweet Potato Black Bean Enchiladas
These vegetarian enchiladas are a staple in my household because they’re hearty, nutritious, and freeze beautifully.
The combination of sweet potatoes and black beans provides plenty of protein and fiber, making this a satisfying meatless option.
I often make a double batch and freeze one pan for later.

| Ingredient | Quantity |
| Sweet potatoes, peeled and diced | 2 large |
| Black beans, drained and rinsed | 2 (15 oz) cans |
| Red onion, diced | 1 large |
| Bell pepper, diced | 1 large |
| Garlic, minced | 4 cloves |
| Cumin | 2 teaspoons |
| Chili powder | 2 teaspoons |
| Smoked paprika | 1 teaspoon |
| Salt | 1 teaspoon |
| Fresh spinach, chopped | 2 cups |
| Corn tortillas | 16-20 |
| Enchilada sauce | 3 (10 oz) cans |
| Monterey Jack cheese, shredded | 3 cups |
| Fresh cilantro, chopped | 1/2 cup |
| Lime juice | 2 tablespoons |
Instructions:
- Preheat oven to 400°F.
- Toss diced sweet potatoes with olive oil, salt, and pepper. Spread on a baking sheet and roast for 20-25 minutes until tender.
- In a large skillet, sauté onion and bell pepper until softened, about 5 minutes.
- Add garlic and cook for 1 minute more.
- Stir in cumin, chili powder, smoked paprika, and salt.
- Add black beans and roasted sweet potatoes to the skillet, gently stirring to combine.
- Fold in chopped spinach and cook until wilted.
- Stir in lime juice and half of the cilantro.
- Reduce oven temperature to 350°F.
- Spread 1/2 cup of enchilada sauce in the bottom of a 9×13 inch baking dish.
- Warm tortillas briefly to make them pliable.
- Fill each tortilla with about 1/4 cup of the sweet potato-black bean mixture and a sprinkle of cheese. Roll up and place seam-side down in the baking dish.
- Pour remaining enchilada sauce over the rolled tortillas and sprinkle with remaining cheese.
- Cover with foil and bake for 20 minutes.
- Remove foil and bake for an additional 10 minutes until cheese is bubbly.
- Garnish with remaining cilantro before serving.
Storage Tips:
These enchiladas will keep in the refrigerator for up to 4 days. For freezing, assemble the enchiladas but do not bake them.
Cover tightly with plastic wrap and aluminum foil and freeze for up to 3 months.
Thaw overnight in the refrigerator before baking as directed, adding about 10-15 minutes to the cooking time.
Variation tip: For a protein boost, add 2 cups of shredded rotisserie chicken to the filling mixture.
You can also swap out the sweet potatoes for butternut squash or regular potatoes if preferred.
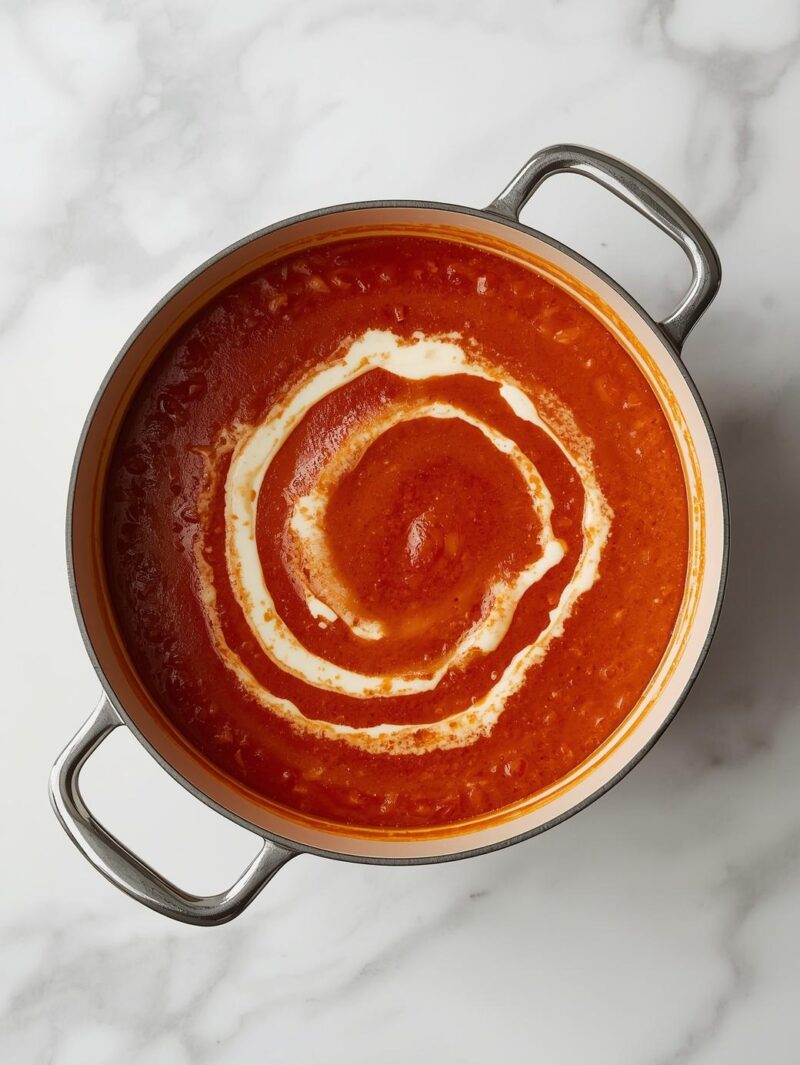
7. Roasted Tomato Soup
There’s nothing more comforting than a bowl of homemade tomato soup, especially when paired with a grilled cheese sandwich.
This roasted tomato soup has incredible depth of flavor thanks to the roasting process, which concentrates and caramelizes the tomatoes.
It freezes perfectly, making it an ideal addition to my 12 recipes to make in bulk collection.
| Ingredient | Quantity |
| Roma tomatoes, halved | 5 pounds |
| Yellow onions, quartered | 2 large |
| Garlic cloves, peeled | 8 |
| Olive oil | 1/4 cup |
| Balsamic vinegar | 2 tablespoons |
| Fresh thyme sprigs | 6 |
| Fresh basil leaves | 1 cup, plus more for garnish |
| Vegetable or chicken broth | 4 cups |
| Tomato paste | 2 tablespoons |
| Heavy cream (optional) | 1/2 cup |
| Sugar | 1 teaspoon |
| Salt and pepper | To taste |
Instructions:
- Preheat oven to 400°F.
- On two large baking sheets, arrange halved tomatoes, quartered onions, and garlic cloves.
- Drizzle with olive oil and balsamic vinegar, then sprinkle with salt and pepper.
- Scatter thyme sprigs over the vegetables.
- Roast for 45 minutes, rotating pans halfway through, until tomatoes are caramelized and onions are soft.
- Discard thyme sprigs.
- Transfer roasted vegetables to a large pot.
- Add broth, tomato paste, and basil leaves.
- Bring to a simmer and cook for 15 minutes.
- Using an immersion blender, puree the soup until smooth (or transfer in batches to a regular blender).
- Stir in sugar and heavy cream if using.
- Season with additional salt and pepper to taste.
- Garnish with fresh basil leaves before serving.
Storage Tips:
If you plan to freeze this soup, I recommend doing so before adding the cream.
The soup will keep in the refrigerator for up to 5 days or in the freezer for up to 3 months.
When reheating, thaw overnight in the refrigerator if frozen, then warm gently on the stovetop. Add the cream after reheating.
Serving suggestion: For a complete meal, serve with grilled cheese sandwiches made with sourdough bread and a mix of cheddar and Gruyère cheeses. The soup also pairs well with a simple green salad.
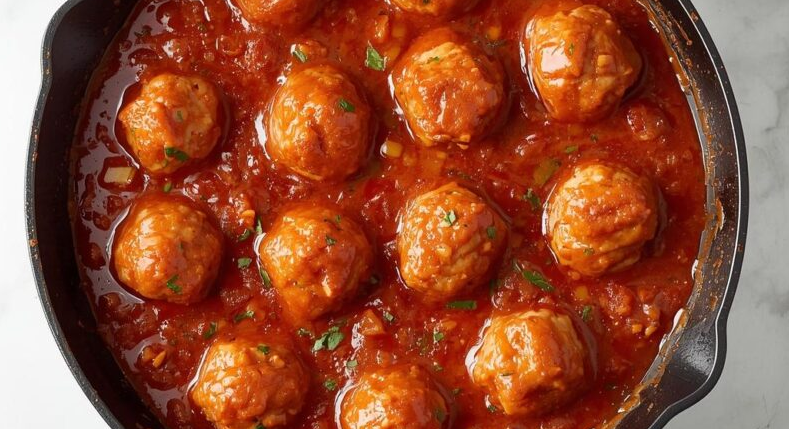
8. Italian Meatballs
Homemade meatballs are so versatile you can serve them with pasta, in sandwiches, on pizza, or even as appetizers with dipping sauce.
Making a big batch takes about the same amount of effort as a small one, so they’re perfect for my collection of 12 recipes to make in bulk.
I always keep some in the freezer for quick weeknight meals.
| Ingredient | Quantity |
| Ground beef | 2 pounds |
| Ground pork | 1 pound |
| Italian breadcrumbs | 1 cup |
| Milk | 1/2 cup |
| Eggs | 3 |
| Parmesan cheese, grated | 1 cup |
| Fresh parsley, chopped | 1/2 cup |
| Garlic, minced | 6 cloves |
| Dried oregano | 2 teaspoons |
| Dried basil | 2 teaspoons |
| Red pepper flakes | 1/2 teaspoon |
| Salt | 2 teaspoons |
| Black pepper | 1 teaspoon |
| Olive oil (for cooking) | 1/4 cup |
| Marinara sauce (for serving) | 2 (24 oz) jars |
Instructions:
- In a small bowl, combine breadcrumbs and milk. Let sit for 5 minutes to create a panade.
- In a large bowl, combine ground beef, ground pork, soaked breadcrumbs, eggs, Parmesan, parsley, garlic, oregano, basil, red pepper flakes, salt, and pepper.
- Mix gently with your hands until just combined (overmixing will result in tough meatballs).
- Form mixture into meatballs about 1.5 inches in diameter (you should get approximately 40-45 meatballs).
- Heat olive oil in a large skillet over medium-high heat.
- Working in batches, brown meatballs on all sides, about 2 minutes per side. They don’t need to be cooked through at this point.
- Transfer browned meatballs to a paper towel-lined plate.
- If serving immediately: Pour marinara sauce into the same skillet, scraping up any browned bits. Return meatballs to the skillet, cover, and simmer for 15-20 minutes until cooked through.
Storage Tips:
For freezing, place browned (but not fully cooked) meatballs on a baking sheet in a single layer and freeze until solid, about 2 hours. Transfer to freezer bags and store for up to 3 months.
To cook from frozen, place meatballs in simmering sauce and cook, covered, for 20-25 minutes until heated through. Alternatively, you can freeze fully cooked meatballs in sauce for up to 3 months.
Serving variations: These meatballs are incredibly versatile! Serve them with spaghetti, in a sub sandwich with melted provolone, on pizza, or with toothpicks as an appetizer.
You can also use them in soups or crumble them for meat sauce.
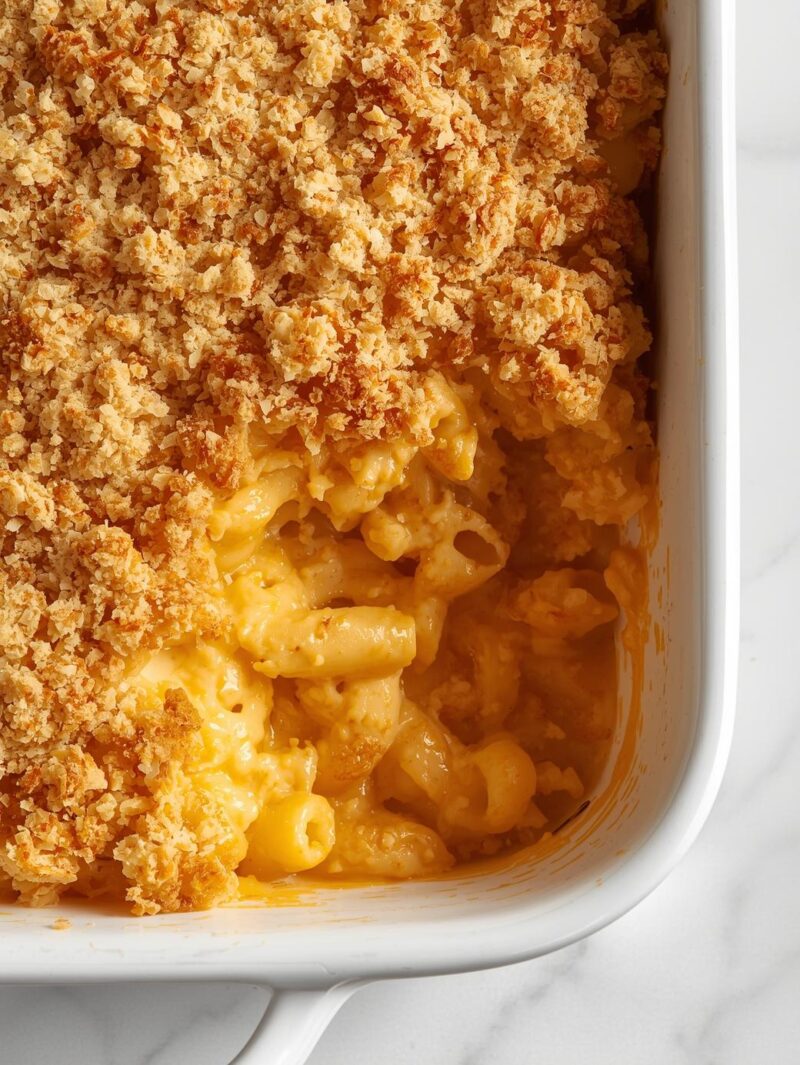
9. Freezer-Friendly Mac and Cheese
Mac and cheese is the ultimate comfort food, and this version is specifically designed to freeze and reheat beautifully.
The secret is in the sauce, which contains a bit of cream cheese to help it stay creamy even after freezing and reheating.
This is always a hit with both kids and adults.
Freezer-Friendly Mac and Cheese
| Ingredient | Quantity |
| Elbow macaroni | 1 pound |
| Butter | 1/2 cup |
| All-purpose flour | 1/2 cup |
| Whole milk | 4 cups |
| Cream cheese | 4 oz |
| Sharp cheddar cheese, shredded | 4 cups |
| Gruyère cheese, shredded | 2 cups |
| Dijon mustard | 1 tablespoon |
| Garlic powder | 1 teaspoon |
| Onion powder | 1 teaspoon |
| Nutmeg | 1/4 teaspoon |
| Salt | 1 teaspoon |
| Black pepper | 1/2 teaspoon |
| Panko breadcrumbs | 1 cup |
| Parmesan cheese, grated | 1/2 cup |
| Melted butter | 2 tablespoons |
Instructions:
- Preheat oven to 350°F.
- Cook macaroni in salted water for 2 minutes less than package directions (it should be very al dente). Drain and set aside.
- In a large pot, melt butter over medium heat.
- Add flour and whisk constantly for 1-2 minutes to make a roux.
- Gradually whisk in milk, ensuring there are no lumps.
- Cook, stirring frequently, until the sauce thickens enough to coat the back of a spoon, about 5-7 minutes.
- Reduce heat to low and add cream cheese, stirring until melted.
- Add cheddar and Gruyère cheeses one handful at a time, stirring until melted before adding more.
- Stir in Dijon mustard, garlic powder, onion powder, nutmeg, salt, and pepper.
- Fold in the cooked macaroni until well coated with cheese sauce.
- Transfer to a greased 9×13 inch baking dish.
- In a small bowl, mix panko breadcrumbs, Parmesan cheese, and melted butter.
- Sprinkle breadcrumb mixture over the mac and cheese.
- Bake for 25-30 minutes until bubbly and golden brown on top.
- Let stand for 10 minutes before serving.
Storage Tips:
For freezing, prepare the recipe through step 11 (before adding the breadcrumb topping), let cool completely, then cover tightly with plastic wrap and aluminum foil.
Freeze for up to 3 months. When ready to bake, thaw overnight in the refrigerator, add the breadcrumb topping, and bake as directed, adding 10-15 minutes to the baking time.
You can also freeze individual portions in small containers for quick lunches or dinners.
Variation idea: Add cooked bacon, diced ham, or broccoli to the mac and cheese before baking for added flavor and nutrition.
For a spicy kick, add a dash of cayenne pepper or a few dashes of hot sauce to the cheese sauce.
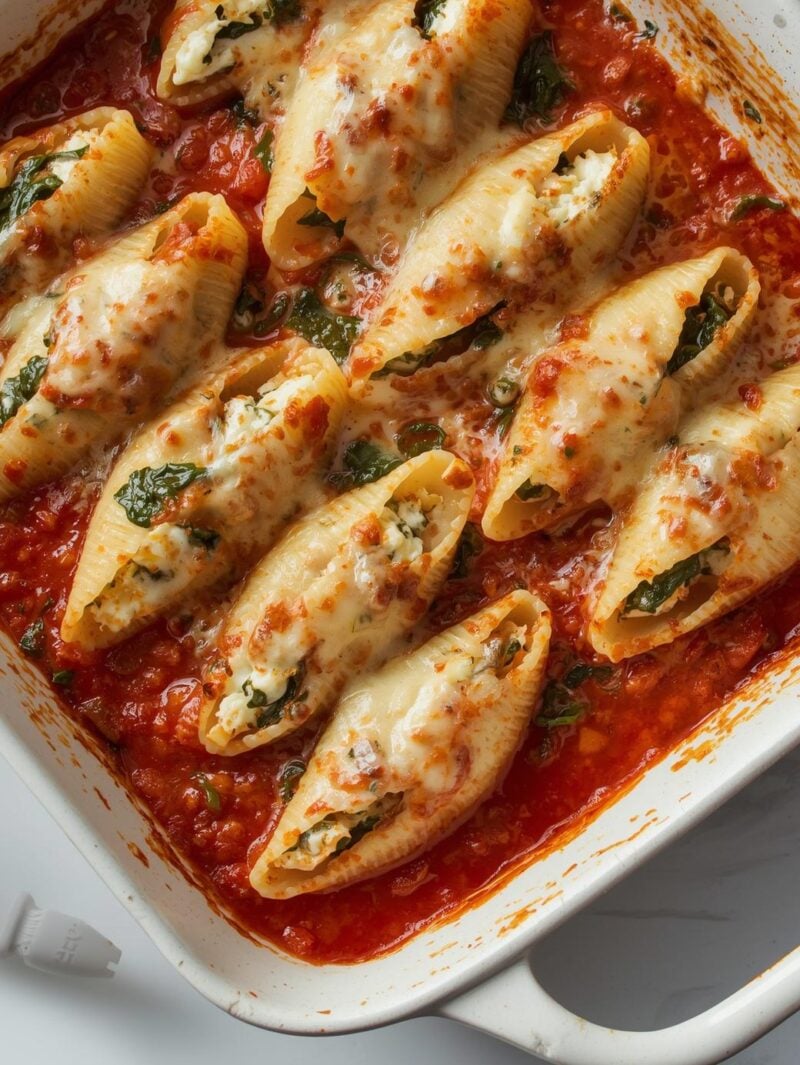
10. Spinach and Ricotta Stuffed Shells
Stuffed shells are impressive enough for company but easy enough for a weeknight dinner when prepared in advance. The combination of creamy ricotta, spinach, and zesty marinara sauce makes this dish a crowd-pleaser. I often make a double batch and freeze one for later.
| Ingredient | Quantity |
| Jumbo pasta shells | 1 (12 oz) box |
| Ricotta cheese | 32 oz |
| Frozen spinach, thawed and squeezed dry | 2 (10 oz) packages |
| Eggs | 2 |
| Parmesan cheese, grated | 1 cup |
| Mozzarella cheese, shredded | 2 cups, divided |
| Fresh parsley, chopped | 1/4 cup |
| Fresh basil, chopped | 1/4 cup |
| Garlic, minced | 4 cloves |
| Nutmeg | 1/4 teaspoon |
| Salt | 1 teaspoon |
| Black pepper | 1/2 teaspoon |
| Marinara sauce | 2 (24 oz) jars |
Instructions:
- Preheat oven to 375°F.
- Cook pasta shells according to package directions, but keep them slightly undercooked. Drain and rinse with cold water to stop cooking.
- In a large bowl, combine ricotta, spinach, eggs, Parmesan, 1 cup of mozzarella, parsley, basil, garlic, nutmeg, salt, and pepper.
- Spread 1 cup of marinara sauce in the bottom of a 9×13 inch baking dish.
- Fill each pasta shell with about 2 tablespoons of the ricotta mixture.
- Arrange filled shells in the baking dish.
- Pour remaining marinara sauce over the shells.
- Sprinkle with remaining 1 cup of mozzarella cheese.
- Cover with foil and bake for 25 minutes.
- Remove foil and bake for an additional 10 minutes until cheese is bubbly and golden.
- Let stand for 10 minutes before serving.
Storage Tips:
These stuffed shells will keep in the refrigerator for up to 4 days. For freezing, prepare through step 8, but do not bake.
Cover tightly with plastic wrap and aluminum foil and freeze for up to 3 months.
Thaw overnight in the refrigerator before baking as directed, adding about 10-15 minutes to the cooking time.
You can also bake from frozen by adding about 30-45 minutes to the cooking time (keep covered with foil for the first hour).
Make-ahead tip: Cook a few extra shells in case some tear during cooking. If you have leftover filling, it makes a delicious spread for toasted bread or can be used as a layer in lasagna.
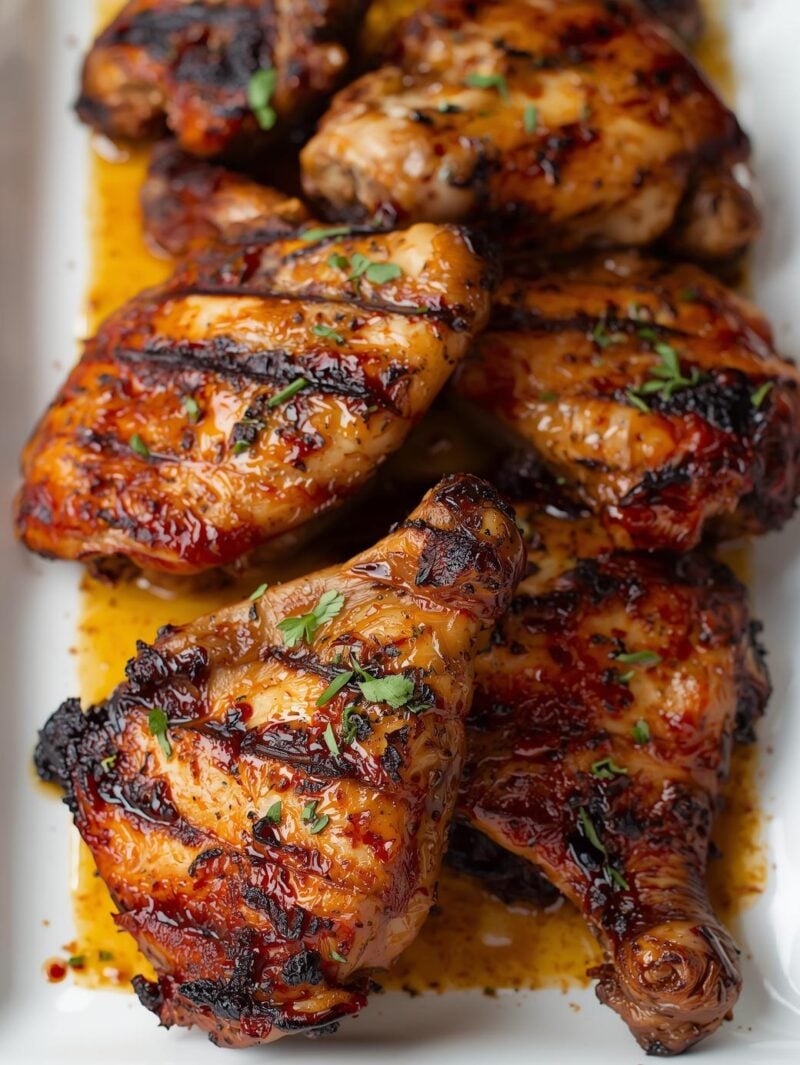
11. Marinated Chicken Thighs
Chicken thighs are economical, flavorful, and versatile, making them perfect for batch cooking. I like to marinate and cook a large quantity at once, then use them throughout the week in salads, sandwiches, wraps, and grain bowls. The marinade in this recipe gives the chicken incredible flavor without much effort.
| Ingredient | Quantity |
| Boneless, skinless chicken thighs | 4 pounds |
| Olive oil | 1/2 cup |
| Lemon juice | 1/4 cup |
| Balsamic vinegar | 1/4 cup |
| Soy sauce | 1/4 cup |
| Honey | 2 tablespoons |
| Dijon mustard | 2 tablespoons |
| Garlic, minced | 6 cloves |
| Fresh rosemary, chopped | 2 tablespoons |
| Fresh thyme leaves | 1 tablespoon |
| Paprika | 1 tablespoon |
| Salt | 2 teaspoons |
| Black pepper | 1 teaspoon |
Instructions:
- In a large bowl or zip-top bag, combine olive oil, lemon juice, balsamic vinegar, soy sauce, honey, Dijon mustard, garlic, rosemary, thyme, paprika, salt, and pepper.
- Add chicken thighs and toss to coat thoroughly.
- Marinate in the refrigerator for at least 2 hours, or preferably overnight.
- Preheat oven to 425°F.
- Remove chicken from marinade and arrange on a baking sheet lined with parchment paper.
- Bake for 20-25 minutes until chicken reaches an internal temperature of 165°F.
- Alternatively, grill chicken over medium-high heat for 5-7 minutes per side until cooked through.
- Let chicken rest for 5 minutes before slicing or serving.
Storage Tips:
Cooked chicken thighs will keep in the refrigerator for up to 4 days.
For freezing, cool completely, then wrap individual portions in plastic wrap and place in freezer bags.
Freeze for up to 3 months.
Thaw overnight in the refrigerator before reheating or using in other recipes.
You can also freeze the raw marinated chicken for up to 3 months simply thaw and cook as directed.
Meal prep idea: Slice or dice the cooked chicken and portion into containers with different sides for ready-to-go lunches.
Try pairing with roasted vegetables and quinoa, or use in wraps with hummus and fresh veggies.
12. No-Bake Energy Bites
These no-bake energy bites are the perfect grab-and-go snack for busy days.
They’re packed with protein, fiber, and healthy fats to keep you satisfied between meals.
I make a big batch every couple of weeks and store them in the freezer for whenever we need a quick energy boost or a healthier sweet treat.

| Ingredient | Quantity |
| Old-fashioned rolled oats | 2 cups |
| Natural peanut butter | 1 cup |
| Ground flaxseed | 1/2 cup |
| Honey | 1/3 cup |
| Mini chocolate chips | 1/2 cup |
| Chia seeds | 2 tablespoons |
| Vanilla extract | 1 teaspoon |
| Cinnamon | 1 teaspoon |
| Salt | 1/4 teaspoon |
Instructions:
- In a large bowl, combine all ingredients and stir until well mixed.
- Cover and refrigerate for at least 30 minutes to allow the mixture to firm up and the oats to soften slightly.
- Using a tablespoon or small cookie scoop, portion the mixture and roll into 1-inch balls with your hands.
- Place on a parchment-lined baking sheet.
- Refrigerate for an additional 15-20 minutes to firm up completely.
Storage Tips:
Store energy bites in an airtight container in the refrigerator for up to 1 week or in the freezer for up to 3 months.
If freezing, separate layers with parchment paper to prevent sticking.
You can enjoy them straight from the freezer or let them thaw for a few minutes at room temperature.
Variation ideas: The basic recipe is incredibly versatile!
Try adding dried cranberries, chopped nuts, coconut flakes, or different nut butters.
For a protein boost, add a scoop of your favorite protein powder and a bit more honey or peanut butter to maintain the right consistency.
Final Thoughts on These 12 Recipes to Make in Bulk
Incorporating these 12 recipes to make in bulk into your meal planning routine can be a game-changer for busy households.
I’ve found that dedicating a few hours on the weekend to batch cooking saves me countless hours during the week when time is at a premium.
Not only does it reduce the daily stress of figuring out “what’s for dinner,” but it also helps us eat healthier, more varied meals even on our busiest days.
The key to successful batch cooking is proper storage and organization.
I recommend investing in good quality, stackable containers that are freezer-safe and clearly labeling everything with contents and dates.
It’s also helpful to keep an inventory of what’s in your freezer so you can plan meals around what you already have.
Remember that not all recipes freeze equally well.
Dishes with cream-based sauces sometimes separate when frozen and thawed, and some vegetables can become mushy.
However, all of the recipes I’ve shared here have been tested and proven to maintain their quality after freezing and reheating.
I hope these recipes inspire you to give batch cooking a try.
Start with just one or two recipes that appeal to your family’s tastes, and gradually build your freezer stash.
Before you know it, you will wonder how you ever managed without these time-saving meals at your fingertips!