I’ve always believed that French desserts represent the pinnacle of culinary artistry.
There’s something magical about the way French pastry chefs transform simple ingredients like butter, sugar, and flour into works of edible art.
After spending a summer in Paris and countless hours in my own kitchen trying to recreate these masterpieces, I am excited to share my favorite 12 Classic French Desserts with you today.
These treats have stood the test of time for good reason they’re absolutely delicious!
From the crisp caramelized top of a crème brûlée to the delicate layers of a mille-feuille, these desserts showcase the techniques and flavors that make French pastry so special.
So grab your whisk and let’s dive into these incredible recipes that will transport your taste buds straight to a Parisian café!
Jump to Your Favorite Dessert
1. Crème Brûlée
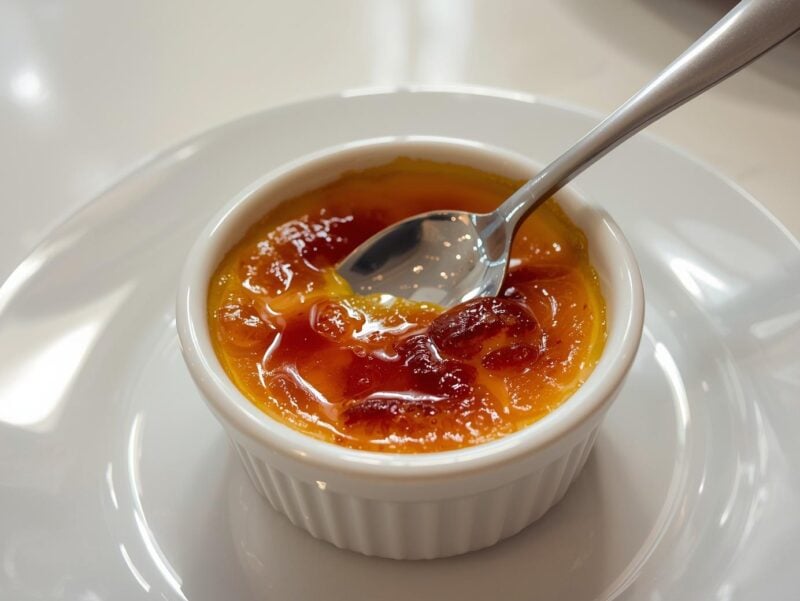
Crème brûlée is arguably the most iconic of all 12 Classic French Desserts.
I fell in love with this dessert during my first trip to Paris, and I’ve been perfecting my recipe ever since.
The contrast between the crisp caramelized sugar top and the silky smooth vanilla custard underneath is simply divine.
What I love most about crème brûlée is that despite its elegant appearance, it’s actually quite simple to make with just a few quality ingredients.
The key to a perfect crème brûlée is patience.
The custard needs to be baked slowly in a water bath to achieve that perfect silky texture.
I’ve found that using real vanilla beans rather than extract makes a world of difference in the flavor.
However, a good quality vanilla extract will work in a pinch.
The most satisfying part, nonetheless, is caramelizing the sugar topping with a kitchen torch and hearing that distinctive “crack” when you break through it with your spoon.
| Ingredients | Quantity |
| Heavy cream | 2 cups |
| Vanilla bean (or extract) | 1 pod (or 1 tsp extract) |
| Egg yolks | 5 large |
| Granulated sugar | 1/2 cup |
| Salt | Pinch |
| Granulated sugar (for topping) | 1/4 cup |
Instructions:
- Preheat your oven to 325°F (165°C).
- In a saucepan, heat the cream and vanilla bean (split and scraped) until it just begins to simmer. Remove from heat and let it steep for 10 minutes.
- In a bowl, whisk together egg yolks, sugar, and salt until pale and slightly thickened.
- Slowly pour the warm cream into the egg mixture, whisking constantly.
- Strain the mixture through a fine sieve into a pouring jug.
- Place 4-6 ramekins in a deep baking dish and fill them with the custard mixture.
- Pour hot water into the baking dish until it reaches halfway up the sides of the ramekins.
- Bake for 30-35 minutes until the custards are set but still slightly jiggly in the center.
- Remove from the water bath and cool completely, then refrigerate for at least 2 hours or overnight.
- Before serving, sprinkle a thin layer of sugar evenly over each custard.
- Use a kitchen torch to caramelize the sugar until golden brown.
- Let the caramelized sugar harden for a minute before serving.
2. Chocolate Éclair
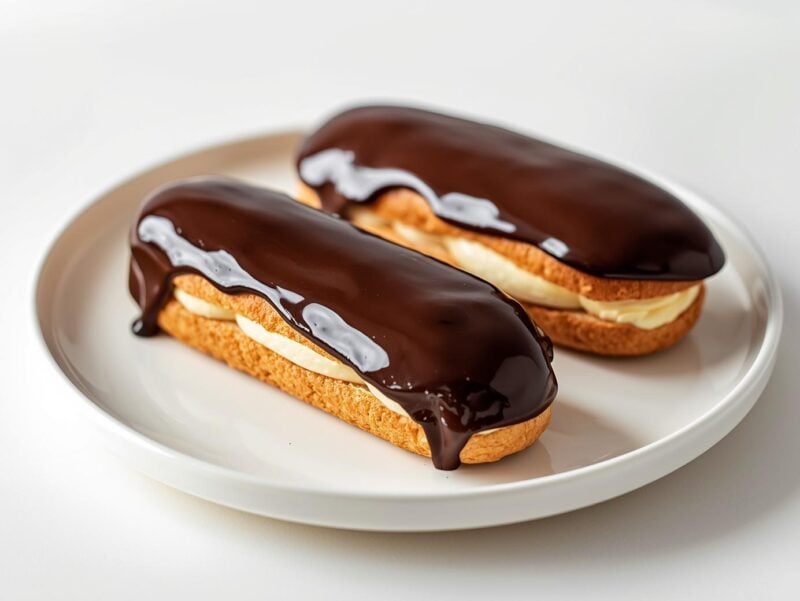
Chocolate éclairs hold a special place in my heart because they were the first French pastry I ever attempted to make at home.
These oblong choux pastry shells filled with vanilla pastry cream and topped with chocolate glaze are a staple in any French patisserie.
The name “éclair” means “lightning” in French, which some say refers to how quickly they disappear once served!
Making choux pastry might seem intimidating at first, but I’ve found that once you understand the technique, it’s actually quite straightforward.
The key is to make sure your choux dough is the right consistency before piping – it should be glossy and hold its shape.
I also recommend letting the pastry cream chill thoroughly before filling the éclairs.
This makes the assembly process much easier and results in a neater final product.
| Ingredients | Quantity |
| Water | 1/2 cup |
| Milk | 1/2 cup |
| Unsalted butter | 1/2 cup (1 stick) |
| Salt | 1/4 tsp |
| Sugar | 1 tsp |
| All-purpose flour | 1 cup |
| Eggs | 4 large |
| Vanilla pastry cream | 2 cups |
| Dark chocolate | 4 oz |
| Heavy cream | 1/2 cup |
Instructions:
- Preheat oven to 375°F (190°C) and line a baking sheet with parchment paper.
- In a saucepan, combine water, milk, butter, salt, and sugar. Bring to a boil.
- Remove from heat and quickly stir in all the flour until a dough forms.
- Return to low heat and cook, stirring constantly, for about 2 minutes until the dough pulls away from the sides.
- Transfer to a mixing bowl and let cool for 5 minutes.
- Add eggs one at a time, beating well after each addition until smooth and glossy.
- Transfer the dough to a piping bag fitted with a large round tip.
- Pipe 4-5 inch logs onto the prepared baking sheet, leaving space between each.
- Bake for 25-30 minutes until golden brown and puffed. Do not open the oven door during baking.
- Let cool completely on a wire rack.
- Use a small knife to make holes at both ends of each éclair.
- Fill a piping bag with pastry cream and pipe into the éclairs through the holes.
- For the glaze, heat heavy cream until just simmering, then pour over chopped chocolate. Let sit for 1 minute, then stir until smooth.
- Dip the top of each filled éclair in the chocolate glaze and refrigerate until set.
3. Tarte Tatin

Tarte Tatin is one of those wonderful culinary accidents that became a classic.
Legend has it that the Tatin sisters, who ran a hotel in France in the 1880s, accidentally created this upside-down apple tart when one sister started to make a traditional apple pie but left the apples cooking in butter and sugar for too long.
In a rush to salvage the dessert, she put the pastry on top of the caramelized apples, baked it, and then flipped it over to serve. The result was so delicious that it became their signature dish!
I love making Tarte Tatin because it’s rustic yet impressive.
The key to success is choosing the right apples you want a variety that holds its shape when cooked, such as Granny Smith, Honeycrisp, or Braeburn.
I’ve found that taking your time with the caramel process is crucial; you want it deep amber but not burnt.
Also, be careful when flipping the tart – it’s hot and can be a bit tricky, but the reveal is so satisfying!
| Ingredients | Quantity |
| Firm apples (Granny Smith or similar) | 6-8 medium |
| Unsalted butter | 6 tbsp |
| Granulated sugar | 3/4 cup |
| Puff pastry | 1 sheet |
| Vanilla ice cream (for serving) | Optional |
Instructions:
- Peel, core, and quarter the apples.
- Melt butter in a 9-10 inch cast-iron skillet over medium heat.
- Add sugar and cook until it turns a light amber color, about 5-8 minutes.
- Remove from heat and carefully arrange the apple quarters in the skillet, rounded side down, fitting them tightly together.
- Return to medium-low heat and cook for about 15-20 minutes until the apples are tender and the caramel is a deep amber color.
- Preheat oven to 375°F (190°C).
- Roll out the puff pastry and cut a circle slightly larger than your skillet.
- Place the pastry over the apples, tucking the edges down inside the skillet.
- Bake for 25-30 minutes until the pastry is golden brown and puffed.
- Let cool for 5-10 minutes, then place a serving plate over the skillet and carefully but quickly flip to invert the tart.
- Serve warm with vanilla ice cream if desired.
4. Macarons
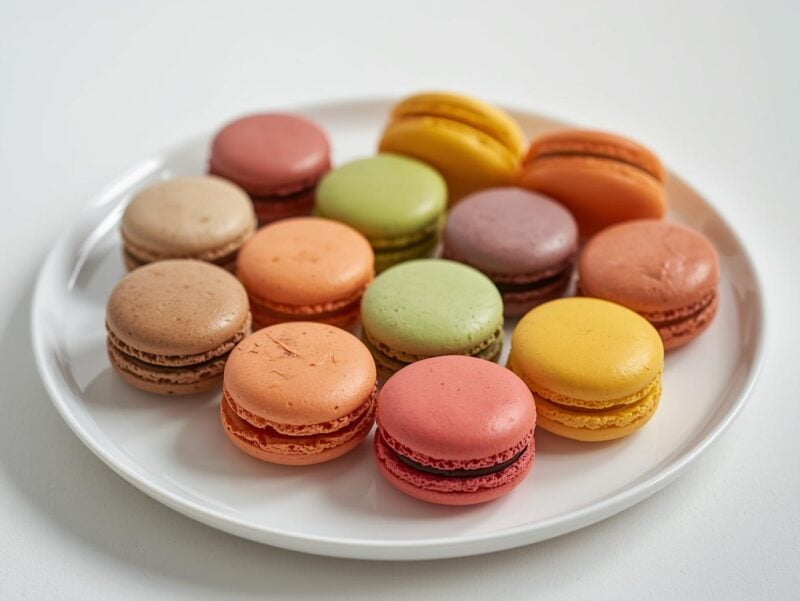
Macarons are perhaps the most Instagram-worthy of all 12 Classic French Desserts.
These delicate almond meringue cookies with ganache, buttercream, or jam filling have become incredibly popular worldwide.
I remember my first attempt at making macarons – it was a complete disaster!
However, after much practice and research, I’ve learned that success comes down to precision and technique.
The most challenging aspect of making macarons is achieving the perfect consistency in your batter what pastry chefs call “macaronage.”
You want to fold the dry ingredients into the meringue just enough that the batter flows like lava when lifted with a spatula.
Too little mixing and your macarons will be lumpy; too much and they’ll spread too thin.
Another crucial step is letting the piped macarons rest before baking, which helps develop that characteristic “foot” at the base.
Despite their reputation for being finicky, I find the process meditative, and the results are always worth the effort.
| Ingredients | Quantity |
| Almond flour | 1 cup |
| Powdered sugar | 1 3/4 cups |
| Egg whites (room temperature) | 3 large (about 100g) |
| Granulated sugar | 1/4 cup |
| Pinch of salt | As needed |
| Gel food coloring (optional) | A few drops |
| Filling of choice (buttercream, ganache, jam) | 1 cup |
Instructions:
- Line two baking sheets with parchment paper or silicone mats.
- Sift together almond flour and powdered sugar, discarding any large pieces.
- In a clean, dry bowl, beat egg whites and salt until foamy.
- Gradually add granulated sugar while continuing to beat until stiff, glossy peaks form.
- Add gel food coloring if desired and mix until incorporated.
- Gently fold the dry ingredients into the meringue in three additions until the batter flows like lava when lifted.
- Transfer batter to a piping bag fitted with a round tip.
- Pipe 1.5-inch rounds onto prepared baking sheets, spacing them 1 inch apart.
- Tap the baking sheets firmly against the counter several times to release air bubbles.
- Let the macarons rest at room temperature for 30-60 minutes until a skin forms on top.
- Preheat oven to 300°F (150°C).
- Bake one sheet at a time for 15-18 minutes, rotating halfway through.
- Let cool completely on the baking sheets before removing.
- Match shells of similar size and sandwich with filling of your choice.
- Store in an airtight container in the refrigerator for 24 hours before serving to allow flavors to mature.
5. Mille-Feuille (Napoleon)
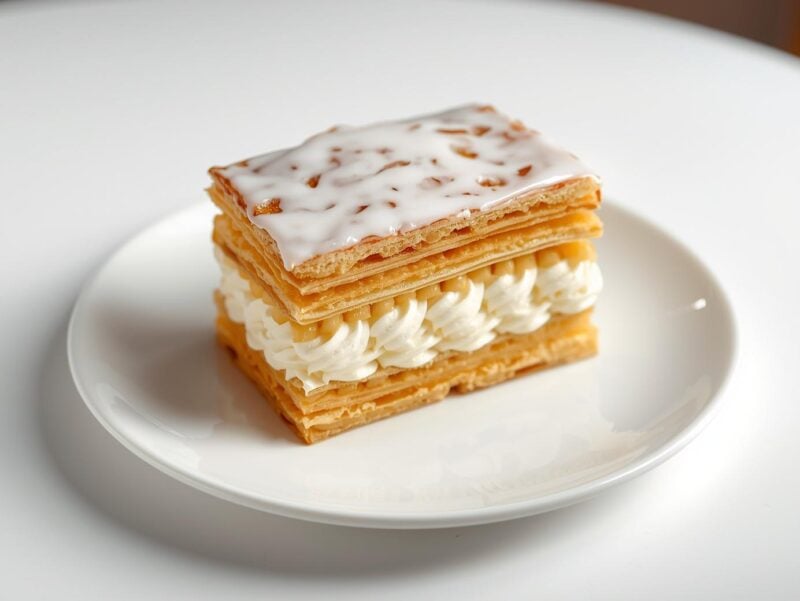
The Mille-Feuille, also known as Napoleon, is a stunning dessert that literally translates to “thousand leaves,” referring to its many layers of puff pastry.
When I first saw this dessert in a Parisian patisserie window, I was mesmerized by its architectural beauty.
The classic version consists of three layers of puff pastry with two layers of pastry cream in between, topped with a distinctive white icing and chocolate feathered pattern.
While making puff pastry from scratch is a labor of love, I often use good-quality store-bought puff pastry to simplify the process.
The key to a great mille-feuille is baking the pastry until it’s deeply golden and crisp, which provides a wonderful textural contrast to the creamy filling.
I also recommend chilling the assembled dessert thoroughly before slicing – this helps maintain those beautiful, defined layers when you cut into it.
Although it looks complex, breaking it down into components makes it quite manageable, and the “wow” factor is definitely worth the effort!
| Ingredients | Quantity |
| Puff pastry sheets | 1 package (14-17 oz) |
| Milk | 2 cups |
| Vanilla bean or extract | 1 pod or 2 tsp extract |
| Egg yolks | 4 large |
| Granulated sugar | 1/2 cup |
| Cornstarch | 1/4 cup |
| Unsalted butter | 2 tbsp |
| Powdered sugar | 1 cup |
| Water | 2-3 tbsp |
| Dark chocolate, melted | 2 oz |
Instructions:
- Preheat oven to 400°F (200°C) and line baking sheets with parchment paper.
- Cut puff pastry into three equal rectangles and place on baking sheets.
- Cover with another sheet of parchment and place a baking sheet on top to prevent excessive rising.
- Bake for 15-18 minutes until golden brown and crisp.
- Remove weights and top parchment, then bake for another 3-5 minutes until deeply golden.
- Let cool completely on wire racks.
- For the pastry cream, heat milk and vanilla in a saucepan until just simmering.
- In a bowl, whisk together egg yolks, sugar, and cornstarch until pale.
- Slowly pour hot milk into egg mixture, whisking constantly.
- Return mixture to saucepan and cook over medium heat, stirring constantly, until thickened.
- Remove from heat, stir in butter, and transfer to a bowl.
- Cover with plastic wrap directly on the surface and refrigerate until cold.
- For assembly, place one pastry layer on a serving plate.
- Spread half the pastry cream evenly over it.
- Top with second pastry layer and remaining pastry cream.
- Place final pastry layer on top.
- For the icing, mix powdered sugar with enough water to make a thick but pourable glaze.
- Spread over the top layer.
- While still wet, drizzle lines of melted chocolate across the icing.
- Drag a toothpick perpendicular to the chocolate lines to create a feathered pattern.
- Refrigerate for at least 2 hours before serving.
- Use a serrated knife to cut into portions.
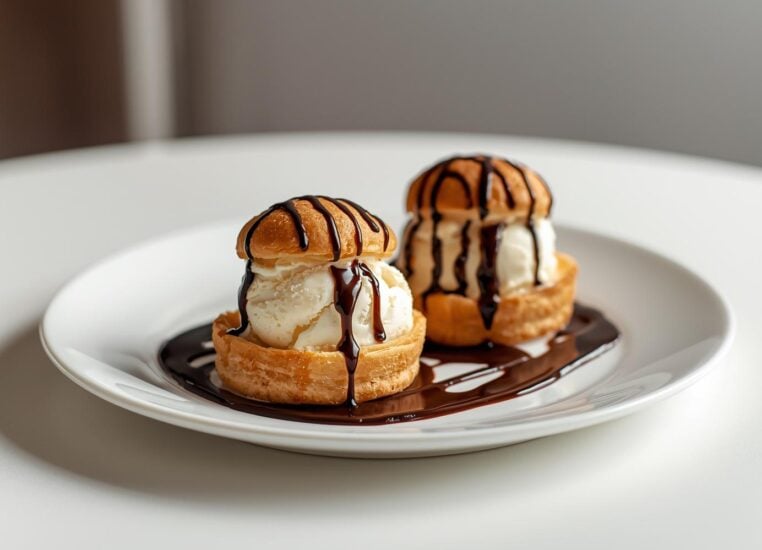
6. Profiteroles

Profiteroles are essentially ice cream-filled cream puffs drizzled with warm chocolate sauce what’s not to love?
These delightful little treats are made from choux pastry, the same dough used for éclairs, but piped into small rounds instead of logs.
I first tried making these for a dinner party, and they were such a hit that they’ve become my go-to impressive-yet-doable dessert for special occasions.
What I particularly love about profiteroles is their versatility.
While the classic filling is vanilla ice cream, you can use any flavor that complements the chocolate sauce.
I’ve experimented with coffee, pistachio, and even salted caramel ice cream with great results.
The chocolate sauce can also be customized with a splash of liqueur like Grand Marnier or Baileys for an adult version.
You can make the choux puffs in advance and store them in an airtight container, then simply fill and sauce them right before serving.
| Ingredients | Quantity |
| Water | 1/2 cup |
| Milk | 1/2 cup |
| Unsalted butter | 1/2 cup (1 stick) |
| Salt | 1/4 tsp |
| Sugar | 1 tsp |
| All-purpose flour | 1 cup |
| Eggs | 4 large |
| Vanilla ice cream | 1 quart |
| Dark chocolate | 8 oz |
| Heavy cream | 1 cup |
| Corn syrup | 1 tbsp |
Instructions:
- Preheat oven to 375°F (190°C) and line baking sheets with parchment paper.
- In a saucepan, combine water, milk, butter, salt, and sugar. Bring to a boil.
- Remove from heat and quickly stir in all the flour until a dough forms.
- Return to low heat and cook, stirring constantly, for about 2 minutes until the dough pulls away from the sides.
- Transfer to a mixing bowl and let cool for 5 minutes.
- Add eggs one at a time, beating well after each addition until smooth and glossy.
- Transfer the dough to a piping bag fitted with a large round tip.
- Pipe 1.5-inch rounds onto the prepared baking sheets, leaving space between each.
- Use a damp finger to smooth any peaks on top of the rounds.
- Bake for 20-25 minutes until golden brown and puffed. Do not open the oven door during baking.
- Remove from oven and immediately poke a small hole in the side of each puff to release steam.
- Let cool completely on a wire rack.
- For the chocolate sauce, heat heavy cream until just simmering.
- Pour over chopped chocolate, add corn syrup, and let sit for 1 minute.
- Stir until smooth and glossy.
- To serve, cut each puff in half horizontally.
- Place a small scoop of ice cream on the bottom half.
- Replace the top half and drizzle with warm chocolate sauce.
- Serve immediately.
7. Opéra Cake
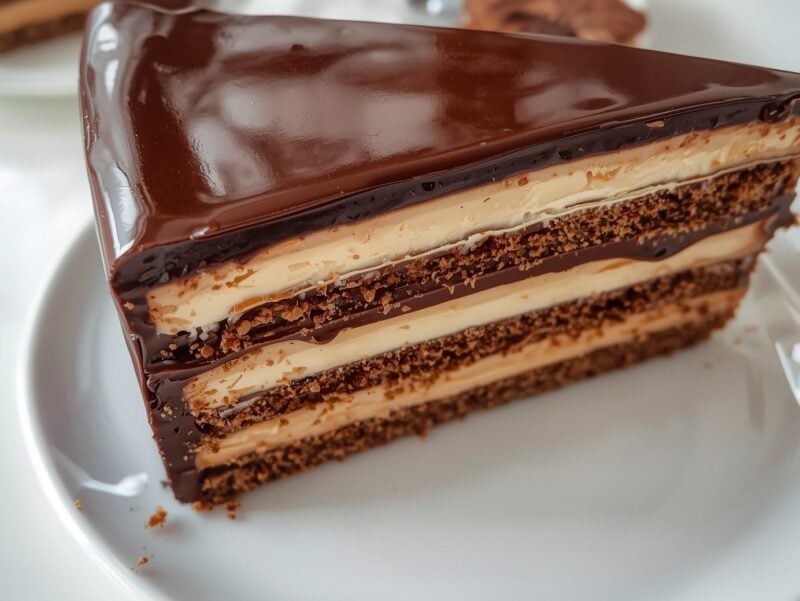
The Opéra cake is a true masterpiece among the 12 Classic French Desserts.
This elegant, rectangular cake consists of thin layers of almond sponge cake soaked in coffee syrup, coffee buttercream, and chocolate ganache, all topped with a glossy chocolate glaze.
It’s said to have been created in the 1950s by pastry chef Cyriaque Gavillon at the famous Dalloyau patisserie in Paris and named after the Paris Opera House.
I won’t lie – this is one of the more complex desserts to make at home, but the result is absolutely worth it.
The key to success is organization and patience.
I recommend making the components over two days to make the process more manageable.
The flavors of coffee and chocolate complement each other beautifully, and the different textures create a symphony in your mouth with each bite.
When sliced, the clean layers reveal the precision of your work, making this a showstopper for special occasions.
| Ingredients | Quantity |
| Almond flour | 1/2 cup |
| Powdered sugar | 1 cup |
| Eggs | 6 large, separated |
| Granulated sugar | 1/4 cup |
| All-purpose flour | 1/4 cup |
| Unsalted butter, melted | 2 tbsp |
| Strong coffee | 1/2 cup |
| Sugar (for syrup) | 1/4 cup |
| Unsalted butter (for buttercream) | 1 cup (2 sticks) |
| Powdered sugar (for buttercream) | 1 1/2 cups |
| Instant espresso powder | 2 tbsp |
| Dark chocolate | 8 oz |
| Heavy cream | 1 cup |
| Corn syrup | 1 tbsp |
Instructions:
- Preheat oven to 425°F (220°C) and line three 9×13 inch baking sheets with parchment paper.
- In a bowl, whisk together almond flour, powdered sugar, and egg yolks until pale and thick.
- In another bowl, beat egg whites until foamy, then gradually add granulated sugar and beat until stiff peaks form.
- Fold a third of the egg whites into the yolk mixture to lighten it.
- Fold in the remaining egg whites gently.
- Sift flour over the batter and fold in, followed by the melted butter.
- Divide batter evenly among the three prepared baking sheets, spreading thinly.
- Bake each layer for 5-7 minutes until lightly golden.
- Let cool completely on wire racks.
- For the coffee syrup, combine strong coffee and sugar in a small saucepan. Bring to a boil, then cool.
- For the buttercream, beat butter until creamy, then gradually add powdered sugar.
- Dissolve espresso powder in 1 tablespoon hot water and add to buttercream. Beat until light and fluffy.
- For the ganache, heat heavy cream until just simmering, then pour over chopped chocolate. Let sit for 1 minute, then stir until smooth.
- To assemble, place one cake layer on a serving plate and brush with coffee syrup.
- Spread half the buttercream evenly over the first layer.
- Top with second cake layer, brush with syrup, and spread with ganache (reserve some for the glaze).
- Top with third cake layer, brush with syrup, and spread with remaining buttercream.
- Refrigerate for at least 1 hour to set.
- For the glaze, warm the reserved ganache with 1 tablespoon corn syrup until pourable.
- Pour over the chilled cake and spread evenly.
- Refrigerate for at least 2 hours before serving.
- Trim edges with a hot knife for clean sides before slicing.
8. Canelés de Bordeaux
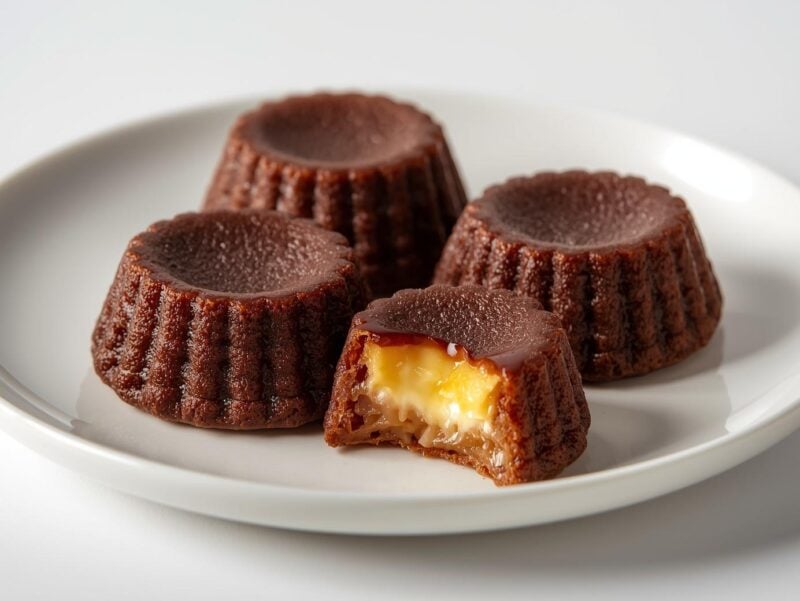
Canelés are small French pastries with a caramelized crust and a soft, custard-like center that originated in the Bordeaux region.
Their distinctive fluted cylindrical shape comes from special copper molds that are traditionally lined with beeswax.
The contrast between the crisp, almost crunchy exterior and the tender, vanilla-scented interior makes them utterly irresistible.
I discovered canelés during a trip to Bordeaux and became obsessed with recreating them at home.
The traditional recipe requires a long resting period for the batter at least 24 hours and up to 3 days which allows the flavors to develop and the flour to fully hydrate.
While copper molds produce the most authentic results, silicone molds are a more affordable alternative that still yield delicious canelés.
These little treats are perfect with coffee or as part of a dessert platter, and they never fail to impress guests who may not have encountered them before.
| Ingredients | Quantity |
| Whole milk | 2 cups |
| Unsalted butter | 2 tbsp |
| Vanilla bean | 1 pod |
| All-purpose flour | 1 cup |
| Granulated sugar | 3/4 cup |
| Egg yolks | 2 large |
| Whole egg | 1 large |
| Dark rum | 2 tbsp |
| Beeswax and butter for molds (or cooking spray) | As needed |
Instructions:
- In a saucepan, heat milk, butter, and split vanilla bean until butter melts. Remove from heat and let cool.
- In a large bowl, whisk together flour and sugar.
- In another bowl, whisk together egg yolks and whole egg.
- Gradually whisk the egg mixture into the flour mixture until smooth.
- Slowly whisk in the cooled milk mixture until well combined.
- Stir in the rum.
- Strain the batter through a fine-mesh sieve into a container.
- Cover and refrigerate for at least 24 hours, or up to 3 days.
- When ready to bake, preheat oven to 450°F (230°C).
- If using traditional copper molds, melt equal parts beeswax and butter and coat the insides of the molds. For silicone molds, a light coating of cooking spray is sufficient.
- Gently stir the batter (do not whisk, as you don’t want to incorporate air).
- Fill the molds about 3/4 full.
- Place in the preheated oven and immediately reduce temperature to 400°F (200°C).
- Bake for 45-50 minutes until deeply caramelized on the outside.
- Remove from oven and let cool for 10 minutes before unmolding.
- Let cool completely on a wire rack.
- Canelés are best enjoyed the day they are baked but will keep for 1-2 days in an airtight container.
9. Financiers
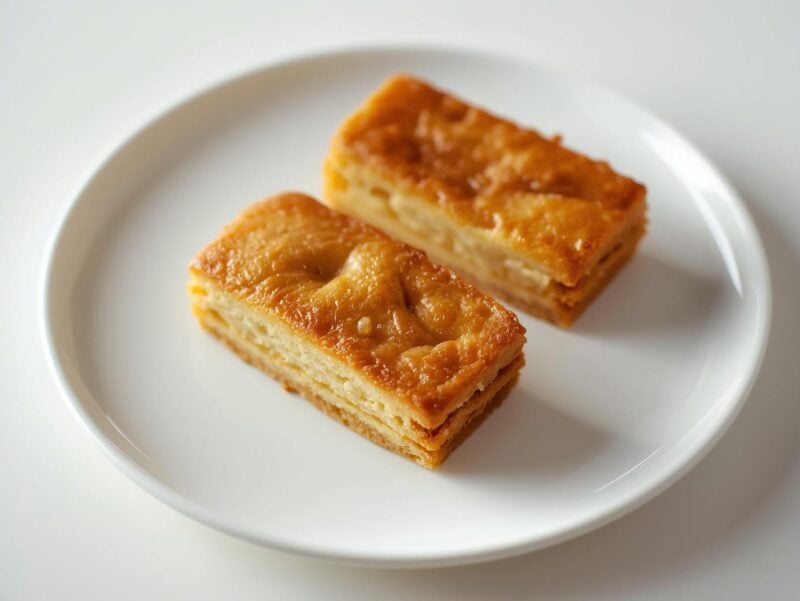
Financiers are small French almond cakes that are traditionally baked in small rectangular molds, resembling gold bars hence their name, which references the financial district in Paris where they were popular.
These little cakes have a crisp exterior and a tender, moist interior with a rich buttery almond flavor.
What makes them special is the use of brown butter (beurre noisette), which gives them a distinctive nutty taste.
I love making financiers because they’re quick to prepare and incredibly versatile.
The basic recipe can be adapted with different add-ins like fresh berries, chocolate chips, or citrus zest.
They’re also perfect for using up leftover egg whites, which is always a bonus when you’ve been making custard-based desserts that require only yolks.
While traditional financier molds are rectangular, you can also use mini muffin tins with excellent results.
These elegant little cakes are perfect with afternoon tea or as a light dessert after a heavy meal.
| Ingredients | Quantity |
| Unsalted butter | 1/2 cup (1 stick) |
| Almond flour | 1/2 cup |
| All-purpose flour | 1/4 cup |
| Powdered sugar | 3/4 cup |
| Egg whites | 4 large |
| Salt | 1/4 tsp |
| Vanilla extract | 1/2 tsp |
| Almond extract | 1/4 tsp |
| Fresh berries or sliced almonds (optional) | As needed |
Instructions:
- Preheat oven to 375°F (190°C) and grease financier molds or mini muffin tins.
- In a small saucepan, melt the butter over medium heat.
- Continue cooking, swirling occasionally, until the butter turns golden brown and smells nutty, about 5-7 minutes.
- Remove from heat and let cool slightly.
- In a bowl, whisk together almond flour, all-purpose flour, powdered sugar, and salt.
- Add egg whites and whisk until smooth.
- Stir in vanilla and almond extracts.
- Gradually whisk in the brown butter until well incorporated.
- Fill the prepared molds about 3/4 full.
- If desired, top with fresh berries or sliced almonds.
- Bake for 15-18 minutes until golden brown and slightly springy to the touch.
- Let cool in the molds for 5 minutes, then transfer to a wire rack to cool completely.
- Store in an airtight container for up to 3 days.
10. Saint-Honoré
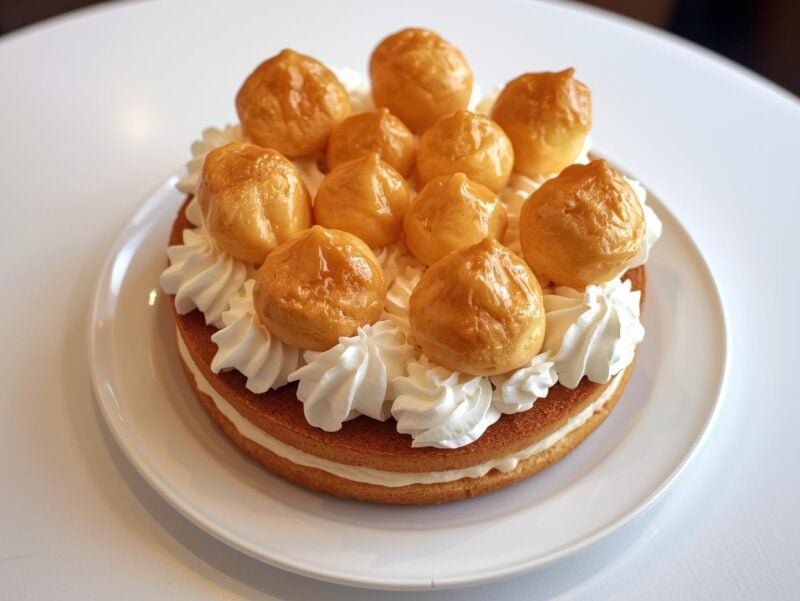
The Saint-Honoré is named after the French patron saint of bakers and pastry chefs, Saint Honoré.
This spectacular dessert consists of a circular puff pastry base topped with a ring of cream puffs that have been dipped in caramelized sugar and filled with pastry cream.
The center is typically filled with Chiboust cream (a lightened pastry cream) or Saint-Honoré cream (a mixture of pastry cream and Italian meringue) and then decorated with whipped cream.
I consider the Saint-Honoré to be one of the most impressive of the 12 Classic French Desserts to make at home.
It combines several pastry techniques in one showstopping creation. The trickiest part is dipping the cream puffs in caramel, which can be a bit intimidating if you’re not used to working with hot sugar.
However, the end result is absolutely worth the effort.
The combination of crisp caramel, tender choux pastry, flaky puff pastry, and creamy fillings creates a dessert that is as delightful to eat as it is to look at.
| Ingredients | Quantity |
| Puff pastry sheet | 1 sheet |
| Water | 1/2 cup |
| Milk | 1/2 cup |
| Unsalted butter | 1/2 cup (1 stick) |
| Salt | 1/4 tsp |
| Sugar | 1 tsp |
| All-purpose flour | 1 cup |
| Eggs | 4 large |
| Milk (for pastry cream) | 2 cups |
| Vanilla bean | 1 pod |
| Egg yolks | 4 large |
| Granulated sugar (for pastry cream) | 1/2 cup |
| Cornstarch | 1/4 cup |
| Unsalted butter (for pastry cream) | 2 tbsp |
| Granulated sugar (for caramel) | 1 cup |
| Water (for caramel) | 1/4 cup |
| Heavy cream | 1 cup |
| Powdered sugar | 2 tbsp |
Instructions:
- Preheat oven to 400°F (200°C) and line baking sheets with parchment paper.
- Cut a 8-inch circle from the puff pastry sheet and place on a baking sheet.
- Prick all over with a fork and bake for 15-20 minutes until golden. Set aside to cool.
- For the choux pastry, combine water, milk, butter, salt, and sugar in a saucepan and bring to a boil.
- Remove from heat and quickly stir in all the flour until a dough forms.
- Return to low heat and cook, stirring constantly, for about 2 minutes until the dough pulls away from the sides.
- Transfer to a mixing bowl and let cool for 5 minutes.
- Add eggs one at a time, beating well after each addition until smooth and glossy.
- Transfer the dough to a piping bag fitted with a large round tip.
- Pipe about 16-20 small rounds (about 1-inch diameter) onto a prepared baking sheet.
- Bake for 20-25 minutes until golden brown and puffed. Let cool completely.
- For the pastry cream, heat milk and vanilla in a saucepan until just simmering.
- In a bowl, whisk together egg yolks, sugar, and cornstarch until pale.
- Slowly pour hot milk into egg mixture, whisking constantly.
- Return mixture to saucepan and cook over medium heat, stirring constantly, until thickened.
- Remove from heat, stir in butter, and transfer to a bowl.
- Cover with plastic wrap directly on the surface and refrigerate until cold.
- Transfer pastry cream to a piping bag fitted with a small round tip.
- Make a small hole in the bottom of each cream puff and fill with pastry cream.
- For the caramel, combine sugar and water in a saucepan over medium heat.
- Cook without stirring until the sugar turns amber, about 8-10 minutes.
- Dip the top of each filled cream puff in the caramel and arrange in a circle on the edge of the puff pastry base, sticking them together with the caramel.
- Whip heavy cream with powdered sugar until stiff peaks form.
- Fill the center of the cake with the remaining pastry cream and top with whipped cream.
- Refrigerate for at least 1 hour before serving.
11. Île Flottante (Floating Island)
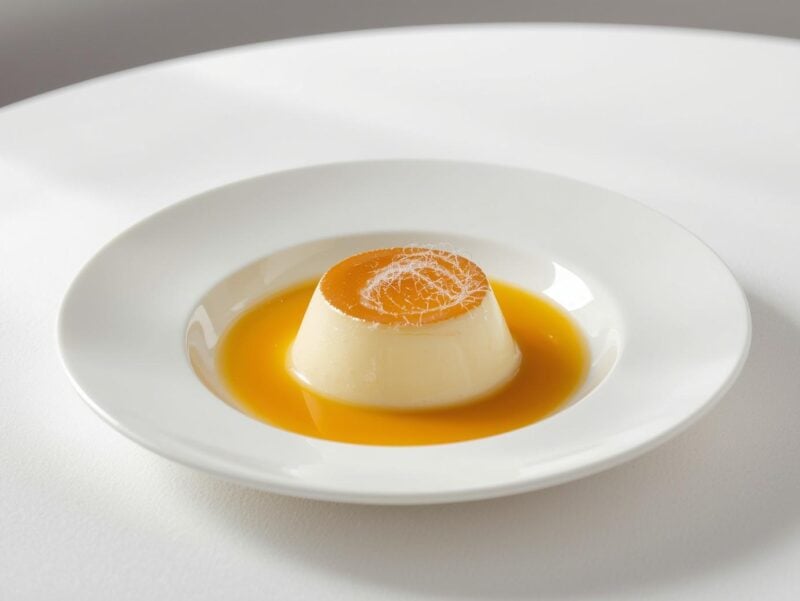
Île Flottante, or “Floating Island,” is a classic French dessert that consists of light, fluffy poached meringue “islands” floating on a sea of vanilla custard (crème anglaise), typically topped with a drizzle of caramel and sometimes toasted almonds.
It’s a study in contrasts – the airy meringue against the rich custard, the sweet caramel against the mild vanilla. This dessert is also sometimes called “Oeufs à la Neige” (Snow Eggs) in France.
I find Île Flottante to be one of the most elegant yet comforting of the 12 Classic French Desserts.
There’s something so soothing about the combination of cool custard and soft meringue.
The traditional method involves poaching quenelles (oval shapes) of meringue in milk, but many modern recipes call for baking the meringue instead, which I find more reliable for home cooks.
The custard sauce should be rich but not too thick it should coat the back of a spoon but still flow gracefully around the meringue islands.
| Ingredients | Quantity |
| Egg whites | 4 large |
| Granulated sugar (for meringue) | 1/2 cup |
| Vanilla extract | 1/2 tsp |
| Whole milk | 2 cups |
| Vanilla bean | 1 pod |
| Egg yolks | 5 large |
| Granulated sugar (for custard) | 1/3 cup |
| Granulated sugar (for caramel) | 1/2 cup |
| Water | 2 tbsp |
| Sliced almonds, toasted | 1/4 cup |
Instructions:
- Preheat oven to 250°F (120°C) and line a baking sheet with parchment paper.
- For the meringue, beat egg whites until foamy, then gradually add sugar while continuing to beat until stiff, glossy peaks form.
- Fold in vanilla extract gently.
- Spoon or pipe 8 large mounds of meringue onto the prepared baking sheet.
- Bake for 30-35 minutes until set but not browned. They should be firm on the outside but still soft inside.
- Let cool while preparing the custard.
- For the crème anglaise, heat milk and split vanilla bean in a saucepan until just simmering.
- In a bowl, whisk together egg yolks and sugar until pale and thick.
- Slowly pour the hot milk into the egg mixture, whisking constantly.
- Return the mixture to the saucepan and cook over low heat, stirring constantly with a wooden spoon, until the custard thickens enough to coat the back of the spoon.
- Strain through a fine-mesh sieve into a bowl and let cool completely.
- For the caramel, combine sugar and water in a small saucepan over medium heat.
- Cook without stirring until the sugar turns amber, about 5-7 minutes.
- Remove from heat immediately.
- To serve, pour the custard into individual serving bowls or a large serving dish.
- Place the meringue islands on top of the custard.
- Drizzle with caramel sauce and sprinkle with toasted almonds.
- Serve immediately or refrigerate for up to 2 hours before serving.
12. Clafoutis
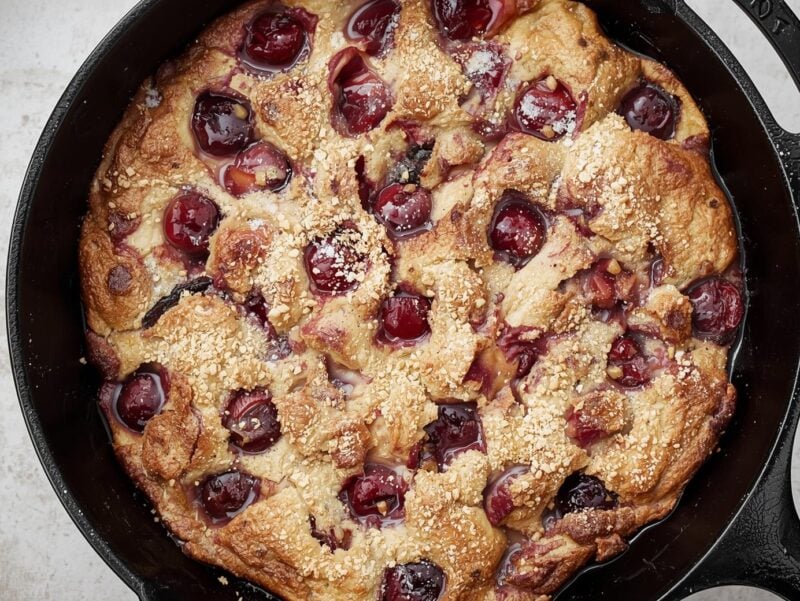
Clafoutis is a rustic French dessert that originates from the Limousin region.
It’s essentially a thick, flan-like batter poured over fruit (traditionally black cherries) and baked until puffed and golden.
The texture is somewhere between a custard and a cake tender and custardy in the center with slightly crisp edges.
Traditional cherry clafoutis is made with unpitted cherries, as the pits are said to impart an almond flavor during baking, but I prefer to pit mine for easier eating.
What I love most about clafoutis is its simplicity and versatility.
While cherries are traditional, you can make it with virtually any fruit – berries, peaches, plums, or apples all work beautifully.
The batter comes together in minutes with basic pantry ingredients, making it perfect for a last-minute dessert when you have guests.
I like to serve it slightly warm with a dusting of powdered sugar, though a scoop of vanilla ice cream never hurts!
This humble dessert proves that French baking doesn’t always have to be complex to be delicious.
| Ingredients | Quantity |
| Fresh cherries, pitted | 3 cups |
| Whole milk | 1 cup |
| Heavy cream | 1/3 cup |
| Eggs | 3 large |
| Granulated sugar | 1/2 cup |
| Vanilla extract | 1 tsp |
| Almond extract | 1/4 tsp |
| All-purpose flour | 2/3 cup |
| Salt | 1/4 tsp |
| Unsalted butter (for greasing) | 1 tbsp |
| Powdered sugar (for dusting) | As needed |
Instructions:
- Preheat oven to 350°F (175°C) and butter a 9-10 inch cast iron skillet or baking dish.
- Arrange the pitted cherries in a single layer in the prepared dish.
- In a blender, combine milk, cream, eggs, sugar, vanilla extract, and almond extract. Blend until smooth.
- Add flour and salt to the blender and pulse just until incorporated. Do not overmix.
- Pour the batter over the cherries.
- Bake for 35-40 minutes until puffed and golden, and a knife inserted in the center comes out clean.
- The clafoutis will puff up during baking but will deflate as it cools – this is normal.
- Let cool slightly before dusting with powdered sugar.
- Serve warm or at room temperature.
Exploring the World of 12 Classic French Desserts
I hope this journey through 12 Classic French Desserts has inspired you to try your hand at French pastry.
From the simple rustic charm of a clafoutis to the architectural precision of an Opéra cake, French desserts offer something for every skill level and occasion.
What I love most about these classics is how they’ve stood the test of time these recipes have been perfected over generations, and each one tells a story about French culinary tradition.
Don’t be intimidated by their fancy names or reputation.
Start with something simpler like crème brûlée or financiers, then work your way up to more complex creations as you build confidence.
Remember that even professional pastry chefs had to start somewhere!
The joy of creating these beautiful desserts and sharing them with loved ones is well worth the effort.
Which of these 12 Classic French Desserts will you try first?
I’d love to hear about your experiences in the kitchen. Happy baking!